Joint Finishes on Historic Brickwork
Gerard Lynch
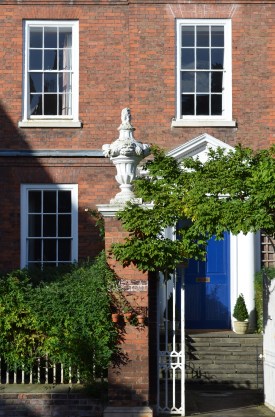 |
| Evidence of the original ‘ruled’ joint finish on a gate pier in Miller’s Green, Gloucester c1741 (Both photos: Jonathan Taylor, all other images by the author) |
 |
The finishing treatments found on the mortar joints of historic brickwork reflect skills and traditions developed over many centuries. Joints can account for 15 to 30 per cent of the facade so when skilfully executed they make an important contribution to the overall aesthetics of the finished brickwork. Understanding the original appearance of brickwork is therefore essential to its appropriate conservation.
Both the mortar and the joints’ surface finish affect the brickwork in several ways. The colour and tone of the mortar lightens or darkens the overall brick facade. How joints are profiled affects how light is caught and reflected: recessing or angling the profile creates shadows in sunlight, emphasising the texture, whereas a subtle profile can obscure the impact of the bricks allowing them to merge into a homogenous surface.
Historically, when bricks were less uniform in colour and regular in shape, the joint finishes could be designed to add accuracy and repose to premier facades by creating the illusion of accuracy. This trompe l’oeil effect relied on finishes to create a grid on the centres of the beds (the horizontal joints) and perpends (perpendicular joints), using either fine grooves, pencilled (painted) lines or precisely trimmed narrow ribbons of fine mortar.
JOINTING
The finished profile of the original mortar joint may be formed either immediately, as the bricks are laid, or later in a separate exercise known as pointing. Jointing is the bricklayer’s term for the action of finishing the joint faces of the bedding mortar as work proceeds. It is the oldest method for finishing brickwork and was mainly executed using trowels until the early 17th century when jointing tools increasingly became standard. It continued to be used for ordinary work and with the decline in craft traditions after the first world war, jointing predominated once again.
Advantages
- unified joint
- uniformity of joint in strength and colour, provided mortar is accurately gauged
- reduced labour costs
Disadvantages
- less quality control of joint finish (not all bricklayers joint well)
- difficulty in maintaining uniform colour throughout the wall face.
POINTING
Pointing is the craft term used to define the application of a separate and frequently superior mortar onto the bedding matrix which is then skilfully brought to the desired finish. As lime mortars used in domestic brickwork were slow-setting, the pointing mortar was applied quite thinly to the still soft bedding mortar, setting as a unified compound joint. Pointing was reserved for premier facades from the 17th century and remained a common site practice until the first world war.
Advantages
- superior joint finish
- uniformity of colour and strength
- greater choice of joint finishes
- clean face work
Disadvantages
- increased labour and material costs
- additional construction time
- if incorrectly executed the compound joint may fail to unite
- requires skilled and experienced pointers.
AIMS
There are two principal reasons for finishing the external joints of brickwork:
Structural Even when properly dampened before laying or pointing, bricks absorb moisture from the mortar. Along with evaporation, this results in partial de-hydration of the joint towards the joint face. So the action of the jointing tool consolidates the surface of the joints closing up shrinkage cracks and protecting against the ingress of driving rain.
 |
|
| Some of the main historic joint profiles |
Aesthetic Jointing or pointing, especially the latter, when executed according to the historic traditions of the craft, are highly-skilled operations. Well jointed or pointed brickwork will be uniformly and precisely finished, no stains will mar the facade and the finished joints will not be obtrusive. The observer’s eye must never be drawn to the joints but, rather, to the overall brickwork and to features such as arches and decorative mouldings.
Inadequate modern training means that most bricklayers today lack knowledge of traditional tools, equipment and materials, and haven’t received the proper level of practical tuition necessary to develop these all-important skills, which at their highest expression are an art. Their work often involves the wrong mortars, including those based on cement (ordinary Portland cement). OPC, being hard, inflexible and dense, is wholly inappropriate for traditionally built brickwork in soft, flexible and porous lime mortars and can cause the bricks themselves to deteriorate. The use of cement-rich mortars is generally ill-timed, heavy-handed and neither true in style or execution, all of which means that many fine facades of historic brickwork are marred or irreversibly ruined.
Colour washing Until the 19th century, when developments in kiln technology produced bricks with a fairly uniform colour, most premier facades were dyed using natural earth pigments such as ochres to regularise uneven brick tones. When brick colours were largely orange to red this was frequently referred to as ‘ochering’, ‘raddling’ or ‘ruddling’, but as buff-coloured bricks became fashionable the term ‘colour washing’ was adopted. The term should not be confused with lime washing: a colourwash does not contain lime. Typically, the earth pigments are mixed in small (weak) ale and/or glue size to help it adhere. Alum (potassium aluminium sulphate), or ‘white copperas’ (zinc sulphate) is used as a mordant to ‘fix’ the pigment and make it weatherproof.
Pencilling If jointed, colour washing results in the joints being coloured too, so these were always picked-out again to re-emphasise the bond, but always to a lesser scale, through a craft practice called pencilling. This was usually executed in white distemper – a mix of crushed chalk (whiting or whitening) and glue size, although black or red pencilling is occasionally seen. Pencilling was frequently applied free-hand with a thin brush until the beginning of the 17th century. Thereafter, during a period characterised by refinement, the application of pencilling was guided by a straight-edge, or rule. As tastes changed and brick quality improved, some designers preferred the natural colours of hand-picked bricks for the facades, so pencilling was sometimes applied to joints on facades which were not colour washed, resulting in just a thin white line in the groove of the joints.
HISTORIC ENGLISH JOINT FINISHES
Flat joint
This is also termed ‘flush’ as the joint is finished level to the brick faces. During the 17th and 18th centuries this was frequently smoothed and after colour washing the facade, joints were neatly pencilled, guided by a rule. This work can be mistaken for tuck pointing. Some designers used it during the Arts & Crafts period, rubbing the suitably stiffened surface of the joints with a hessian sack to raise the aggregate and give a rustic appearance that led to the name ‘bagged joint’. The technique was derided by highly-skilled, London pointers as the ‘Westminster Smear’.
 |
 |
|
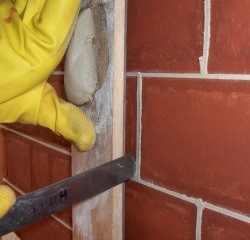
| Pigmented black ‘weather-struck and cut’ pointing | Applying a ‘double-struck’ profile to a bed joint | |
 |
 |
|
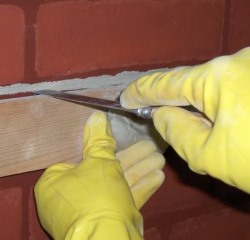
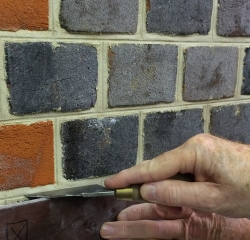
| Using the adapted knife or ‘Frenchman’ to trim a bed joint ribbon during tuck pointing | Using the adapted knife or ‘Frenchman’ to trim the joint ribbon of a perpend during tuck pointing |
Struck joint
The craft term for inclining a joint finish is ‘striking’. During the 15th century some joints were crudely ‘struck’ when jointing with the trowel by inclining the finish of the bed joint in towards the upper arris of the lower brick, so the lower edge was slightly recessed.
The technique developed as a way of hiding variations in brick shapes: the top of each course of bricks was carefully ‘lined-in’ by the bricklayers, but the lower edge was irregular as a result. Striking emphasised the straightest edge and helped to hide the more uneven lower arrises. The perpends were also struck, typically from right to left.
As brick quality improved, joints became thinner and more regular in size. As a result this joint became refined as either a jointed or pointed finish. The joints were struck and trimmed precisely with a jointer and an adapted knife called a ‘Frenchman’, guided by the pointing rule.
If after being struck the joints were then ruled this was called ‘struck and ruled’, or ‘joints jointed’. By the 19th century it began to be called ‘overhand-struck’, because it was indicative of being profiled by working overhand, or from the inside the wall, and also to distinguish it from the new and increasingly popular ‘weatherstruck’ joint profile, which was recessed at the top of the joint.
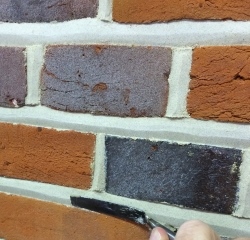
Double-struck joint
A jointed profile formed by drawing the trowel along the mortar, just in from the arris of the upper course of bricks and then reversing the action by cutting in behind the arris of the lower bricks to produce an approximate raised centre line. It is seen from the 15th century onwards and was often used on high-status Tudor buildings such as Hampton Court Palace. Here there is a 1522 example of red colour-washed brickwork with pigmented double-struck joints which have been pencilled white on the lower half of all the bed joints and to one side of the perpends. This technique reduces the aesthetic impact of the large joints by 50 per cent.
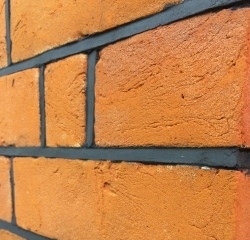
Ruled joint
This joint became popular during the early 17th century when the desire for a refined appearance of line and verticality were paramount. The profile was formed, after the face of the joints had been either slightly flattened or struck, by running a thin-bladed jointer, guided by the pointing-rule, along the centre of the beds and perpends to form a groove, typically 2-3mm wide. Depending on the shape of the edge of the blade the groove could be squared or slightly rounded. During the later 19th century some craftsmen used the edge of an old penny to effect the groove, leading to the name ‘penny-round’ or ‘pennystruck’ joint. This was never achieved, as some have suggested, by grooving with the tip of a trowel, as that would simply slice the joints and is aesthetically unsatisfactory.
Tuck pointing
Tuck pointing appeared in the late 17th century when it was known as ‘tuck and pat’ work. Reserved for the premier facades of standard brickwork and for ‘axed’ arches (with tapered bricks), it was used to mimic the aesthetics of finely jointed gauged work. Executed properly, it remains the most highly skilled area of pointing.
 |
 |
|
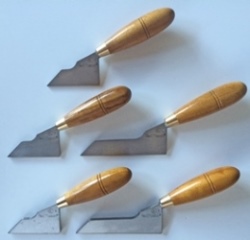
| A selection of traditional-styled brick jointers available from The Red Mason range | A thin-bladed jointer run along a bed joint, guided by the levelled ‘pointing rule’, to create a ‘ruled’ joint | |
 |
 |
|
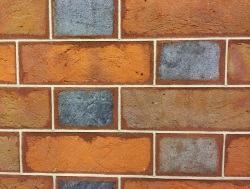
| An example of fine and accurate tuck pointing | An example of early 18th-century white coloured ‘pencilling’ applied over a ‘ruled’ joint |
A backing or ‘stopping’ mortar, coloured to match the bricks, was applied to the bed and perpends and finished flush to the bricks and then set out with a grid of very thin grooves. The grid established level and plumb, and the groove helped to lock-in the centre of the rear of the lime putty and silver sand mix which was applied over them using a jointer guided by a pointing rule or ‘feather edge’. This was then trimmed top and bottom with the Frenchman to form precisely sized narrow ribbons. Although usually cream coloured, black and occasionally red ribbons were also used in the Victorian period.
As tuck pointing was used to create the illusion of fine, accurately bonded brickwork, the ribbons of mortar are often found to have been applied across the faces of the colour-washed bricks to create entirely fictitious perpends, and sometimes to correct discrepancies in courses too.
Bastard tuck
Less common, this profile is seen as a skilfully executed jointed or pointed finish. A less sophisticated version of tuck pointing, it was used to create neatly finished ribbons. When jointed this was achieved by carefully cutting the bedding mortar with the Frenchman just in from the arrises. When pointed, a neutral stopping mortar would be applied, flushed and grooved, with the same stopping mortar laid on in the manner of true tuck pointing, and trimmed to form ribbons. These ribbons were also occasionally pencilled to finish and emphasise them.
Weather-struck joint
Dating from the 19th century and most common in civil engineering work, this profile is formed by compressing the top portion of the joint more than the lower, inclining the blade of the trowel or jointer as the joint is finished in a one-direction stroke. This causes the upper edge of the joint to come slightly in from the arrises of the upper bricks and flush with the upper arrises of the lower bricks (and never protruding). The perpends, which are struck first, are sloped from left to right, to angle it flush to the neighbouring brick.
When the trowel is used to form this profile on the bedding mortar it is called ‘weathered jointing’. A superior pointed finish, ‘weather-struck and cut’, involves the profiled joints being trimmed using a feather-edge and the Frenchman. Traditional pointers did not use trowels to strike the joint, instead using a technique based on tuck pointing that created a regular, accurate and subtle profile. When executed in cement-rich mortar with heavy profiling, this joint can be very ugly indeed.
CONSERVATION PHILOSOPHY
When repairing or conserving historic brickwork it is easy to overlook the original profile where worn and eroded, and many buildings repointed in recent years have now lost all trace of their original details. The result has a dramatic impact on the character of the original brickwork. Before any repointing is carried out, it is most important to carry out a thorough survey, carefully examining sheltered areas for the original profile and for traces of colour. Any variation from the original aggregate, mix, profile and colour should only be made where there is clear evidence that the original would be harmful to the surviving brickwork.