
Decorative Timber Repairs
Robin Russell
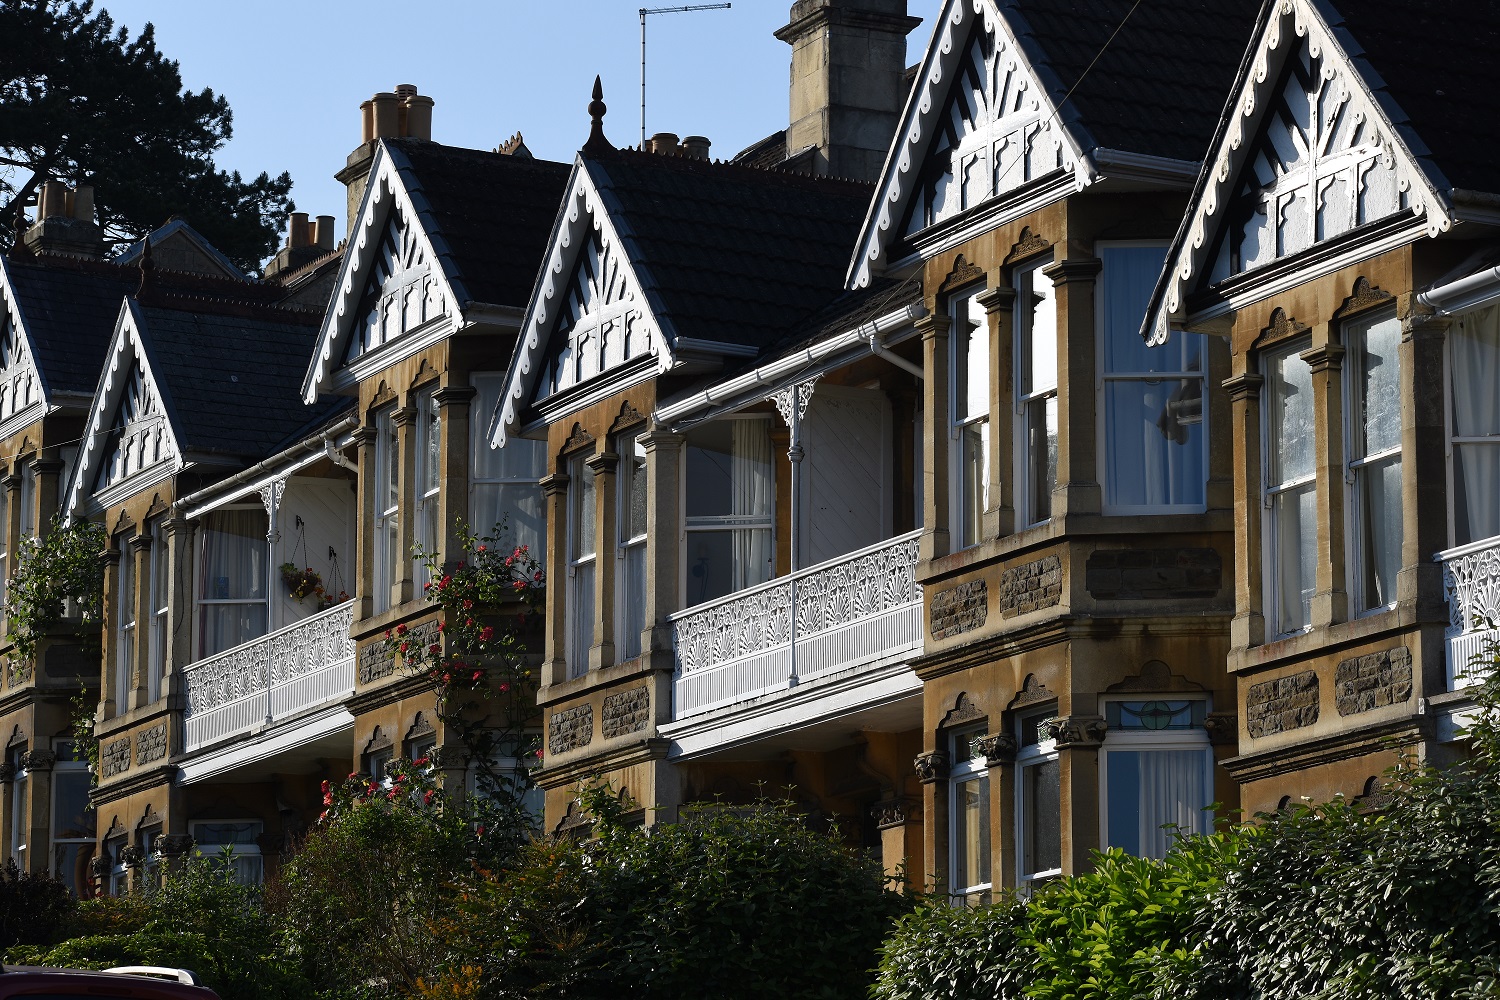
Decorative timberwork on the outside of buildings is extremely vulnerable to poor maintenance, ill-considered repairs and inappropriate replacement, and fine examples like this are increasingly rare. (Photo: Jonathan Taylor)
The term decorative timber is used here to include joinery and timbers that are visible and not structurally supporting any other part of the building. The component may be a window, door, skirting, a screen wall or panelling, or a fancy beam. The issue may be that a piece is missing or that it has been damaged by decay or insect attack. Or it could be an old repair that is very visible and disfiguring, which the owner wishes to repair it in a more aesthetic way. In some cases the original timber will have a decorative finish (paint, wood graining or varnish for example) which also needs to be retained.
Repairs v Replacement
The first question you might ask is why bother? It may seem simpler to replace damaged timberwork than to repair it, but the amount of historic fabric that can be saved by repairing rather than replacing is truly significant and, by doing so, architectural features and decoration are retained.
Where a building is listed, consent is required for all alterations, and conservation officers obviously much prefer repairs. Furthermore, the timber available today cannot match the quality of timber found in historic buildings. Often we find that the windows we are renewing are 20th century replacement while the historic ones are still serviceable, even if in a shocking condition. And finally, the costs of repair are often (but not always) lower than replacement.
If people realised how much of the historic fabric can usually be saved, when they took into consideration the value of the historic fabric combined with the lesser intervention thats likely and similar or lower costs, its certain many people would choose repairs rather than replacement. Unless of course that is, they foolishly think a new item has got to be better.
 |
|
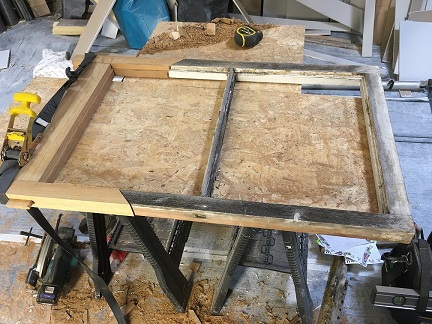
| A casement window being repaired in the workshop: the bottom rail has been replaced and the two styles have been cut short to allow new sections to be let in. |
Method
There are several approaches that might be adopted when dealing with a repair. They include letting in or splicing with new timber alone, a full resin repair, insertion of a timber section but adjoined with resin, or reinforcement by joining fragments together or by attaching them to a substrate. Alternately the decayed or damaged timber may simply be consolidated as it remains using resins or adhesives. The method of repair chosen will be based on several factors, assessed on a case by case basis:
- Minimal intervention: consider what would be the most effective way of removing as little historic fabric as possible.
- Functionality: how the component is used and the environment in which it is located are also vitally important. Some repairs may only be possible using a resin as in certain instances modern, resins completely out-perform timber repairs. Building up a rotten glazing bar on a Georgian window, for example, may avoid having to replace the whole sash.
- Aesthetics: one factor is whether the repair is to be finished with something opaque (such as paint), or whether the repair will be visible through a stained, translucent or natural finish. If the latter, it may be important to make the junction between the two materials as neat and as invisible and so aesthetically pleasing as possible.
- Cost and benefit: where the cost of repairing a component is likely to be greater than the cost of replacing it, some cost-benefit analysis may help prioritise work. In other words, more time and care (and so cost) should be afforded to a feature thats more special.
- Reinforcement: reinforcing pieces may be attached to individual members to strengthen them, preferably invisibly. For more extensive damage, old pieces can be supported or reinforced by attaching them to a substrate board or new timber, so they are in the right places and the new substrate does the work. Generally, the support would be hidden behind the original material, but if a great deal of the original was lost, it may be necessary to create an honest repair showing the support. On items of any significance, the new timber repair can be dated in a concealed place, so it can be easily identified as a repair in the future.
 |
|
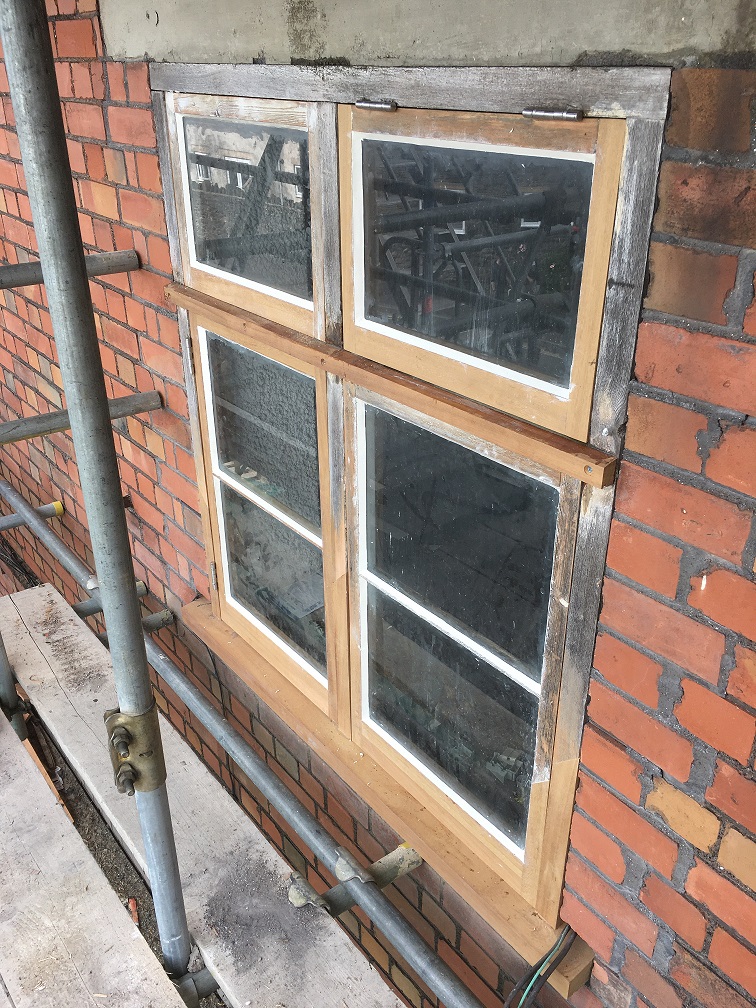
| The same window installed - the repairs enabled maximum retention of original fabric. (Both photos: Robin Russell) |
Letting in
Where new timber is to be let in, any damaged material that cant be incorporated in the repair is removed, taking the item back to original material or to a point where the parent material is sound enough that the new material can be attached. Previous repairs may be kept or discarded once their intrinsic value, condition and aesthetics have all been carefully considered. Sometimes quite a complicated shaped original timber can result.
Timber selection
The correct choice of timber is vital for any repair. The new and old timber junction will expand and contract depending on temperature, moisture content or grain direction and so it is important to choose as similar a type of timber as possible and direction of grain.
The new timber should be allowed to acclimatise significantly, so that the moisture content of both pieces is very close, before it is cut and shaped. Shrinkage or expansion may occur afterwards otherwise and the junction of the two pieces would then be poor.
If differential movement occurs on an item that is painted, cracking of the paint often results. If the repair is then subject to rain, water will find its way into the crack, resulting in decay and further loss of material and another repair may soon be needed.
Joining
When it comes to joining the new and the old, a variety of techniques can be employed. It may be that the new piece can simply be screwed to the old using stainless or non-ferrous fixings to minimise corrosion. Also, screw heads can be hidden beneath a wooden pellet of a similar material, positioned so the grain is in line and planed or fitted to a similar finish.
Traditional carpentry jointing techniques such as mortice and tenons, splices and bridle joints may be used. Dowels may also be used and they can often be discretely positioned along the edge of the pieces to be affixed in the repair so that they are almost invisible.
Sometimes a repair may be as simple as injecting glue to a split, then clamping or wedging the split together until its firm. Polyurethane (PU) glue is good for this as any voids will be filled as it expands during curing and any excess can be removed afterwards.
Any movement of the new timber may cause warping or cracking of the timber. If thats likely to be a problem, then the new could be joined to the old using joints or joining pieces that allow for differential movement.
Resin repairs
 |
|
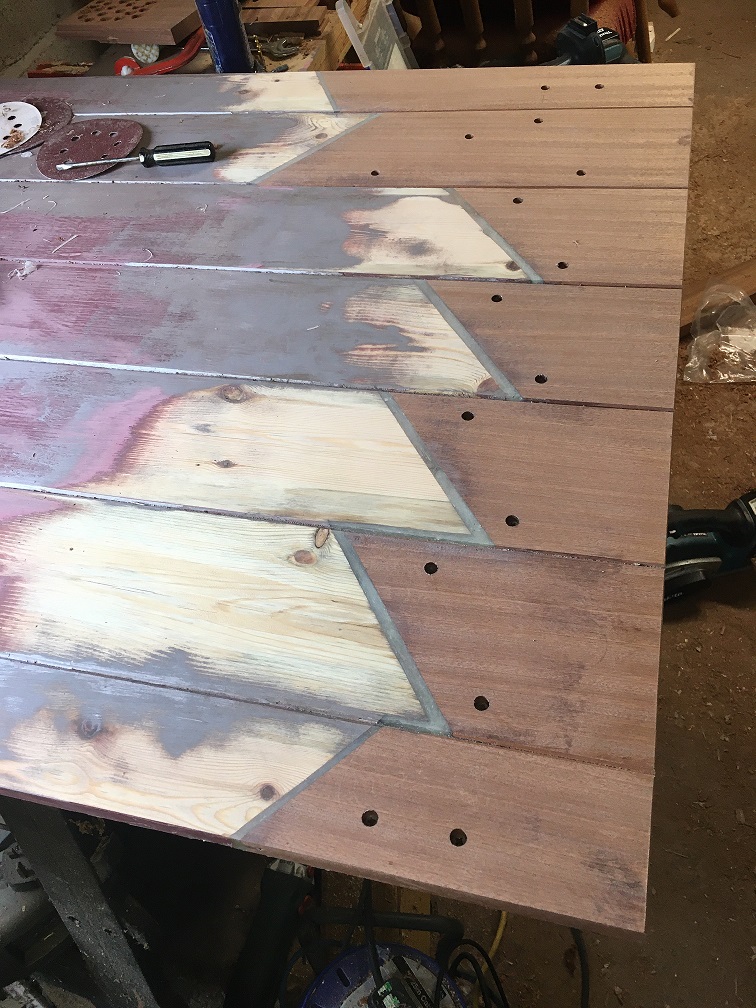
| Scarf repairs to a painted boarded door using an epoxy resin: the thickness of the joint is to allow flexibility so that the paint will not crack. (Photo: Robin Russell) |
Resin can also be used to join a repair piece to the original. This technique works particularly well if the repair requires a degree of movement between the pieces, for example ensuring that overpainting will not crack. In these instances a minimum of 5 mm of epoxy resin is recommended. This technique has the further advantage that a timber profile can be made up and then joined to the original. More good timber doesnt have to be lost in order to create a suitable cut off point for an easier timber repair.
The resin joining the two infills allows some flexibility and can be shaped easily after joining, producing a very hard to detect joint which is unlikely to crack. Resin can offer quicker, easier repairs to timber and also allows complex in situ repair, which in turn minimises the potential for damage during dismantling. Repair of items that would simply be impossible or incredibly difficult with timber can be achieved with resin if well specified.
While resin definitely has a place in repair, it is not popular with some carpenters. It suffers from bad press associated with earlier poor performing resins which didnt bond with the substrate timbers at a molecular level and unfortunately are still being sold today. In particular, a four-part epoxy system is far superior to a two-part one as it incorporates a fluid two-part resin which flows into the wood to harden and consolidate it, allowing the later two-part repair to bond far more firmly with sound timber, not just at the surface.
Poor application of resin repairs, bad technique, and moisture have led to mistrust. In reality there are probably as many poor timber repairs, but craftspeople are not so keen to talk about them and the failures arent as spectacular.
Resins also lend themselves to consolidation. Low viscosity epoxy for example can be poured or injected into cracks, crevices and worm holes of an important historical piece, binding a fragile surface and saving it from further losses. Additional treatment for insect or fungal attack may of course be required and temporary filler, clay or plasticine may be needed to plug up any places the resin would run from until its cured.
Apart from epoxy resins, acrylic resin has the advantage of being reversible and as the compound is prepared by dissolving the solid resin in a volatile organic solvent, the conservator can adjust the proportion of polymer according to the intended use and the viscosity required. However, one issue to be aware of is that the polymer tends to accumulate at the surface as the solvent evaporates, and this can be a problem for some applications. Thixotropic resins can also be invaluable in certain circumstances. Because they stiffen as soon as you stop agitating them, they enable repairs to be made in situations where non-thixotropic resins would slump or run out of the repair position.

Panelling often splits because the panels have been fixed so that they are no longer able to move, and decay can be an issue where in contact with damp masonry. (Photo: Robin Russell)
Surface finishes
If paint is to be applied afterwards, filler can be used to improve surface finish and repair dents and scrapes. If the surface is to be left unpainted microcrystalline wax, rather than varnish or shellac, can be employed to consolidate friable surfaces.
Where only the decorative surface of a timber is to be retained, it is possible to cut the rest of the timber away, leaving as little as 3mm of timber. This can then be planted onto a new timber using a reversible adhesive with any gaps filled with reversible filler. If mechanical fixings are essential, places for these should be carefully chosen to minimise their impact both physically and aesthetically.
Examples
Creaking stairs - Stair treads and floorboards often creak as one piece of timber rubs against another. Wedges to the underside of treads or risers may need to be replaced or re-fixed, and additional blocks and reinforcing pieces may be fixed from below to restore structural integrity. Where access from below is not possible, connections may be improved using screws and dowels as outlined above. If it is still not possible to prevent movement sufficiently, a second material can be introduced between the two to provide a slip plane which should eliminate the noise.
Doors and windows - Rain often affects the timber of doors and windows closest to the bottom due to rain splashing off the threshold or window cill, or from water running down from above. The bottom rail and the bottom corners of stiles of doors and windows are particularly vulnerable to decay, even on upper sash windows. Glazing bars also suffer and sills are very much subject to the weather, especially if poor design means that water pools underneath. Removing localised rot and replacing with resin is quick and effective in saving the vast majority of the window or door, but often it will be necessary to replace the lower horizontal components (bottom rails and weather bars for example) and splice in new pieces to the bottom of the stiles and other vertical components.
Timber decorations and trims - In the past timber has been used in many decorative ways and the ravages of time has not always been kind to these elements. These are frequently the features which make a place special and are very much worthy of saving. It could be a decorative barge board, decoration to a beam or a shop front. Resins work well either in the replacement of decayed timber or to consolidate what is left, even if it has become very friable or worm ridden. Reinforcement with additional timber may also be used to good effect, with the remains of the original decorative feature attached to the new timber substrate.
Recommended Reading
English Heritage Practical Building Conservation: Timber, Ashgate 2012