
Lead Fixing for Historic Ironwork
David Field and Adrian Legge
 |
||
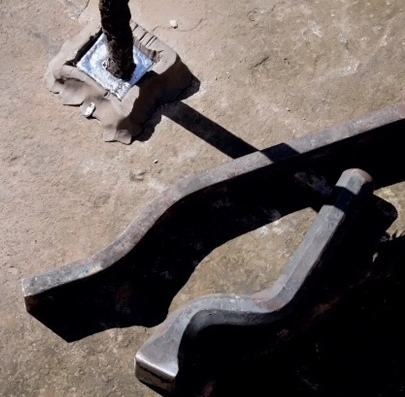
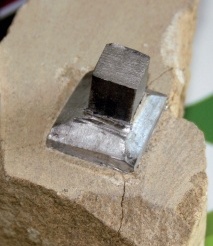
| Poured lead still contained by the clay bund, and two caulking tools (Photo: A Legge) |
The use of lead as a means of securing iron into masonry dates back to pre-medieval times.
The 12th-century ferramenta of the south oculus window of Canterbury Cathedral, which is almost 4.5m in diameter, is secured with a mixture of lead sheet/wool and lead putty. This technique was also used extensively during the Georgian and Victorian periods for securing architectural and cast iron components such as gates, railings and structural cramps.
Lead makes an excellent medium for securing iron as it can be caulked down to provide a strong friction-fit and, with proper preparation, it forms an almost watertight joint. (The term ‘caulk’ is used to describe both the process and the material used to seal a gap and make it watertight. According to the OED, it derives from Old Northern French cauquer or cauchier, ‘to tread, press with force’.)
The lead in the joint should extend above the surface of the stonework and slope down and away from the ironwork so as to carry away any moisture. Care must be taken to avoid over-caulking because the lead can put strain on the stonework, especially near edges, which can cause surface spalling or even deep cracks and faults.
Un-braced fixing points can fail when loads are applied to the structure. The movement of the iron in the stonework will tend to compress the lead creating loose joints, increasing the possibility of water ingress through capillary action and increasing the risk that the stonework will split due to frost or rust jacking. As iron in the joint rusts it can expand up to seven times the volume of the original iron, generating huge expansion strains, often causing failure of the surrounding stonework and, in severe cases, affecting the integrity of the building. Localised corrosion in ironwork often occurs close to fixing points, usually due to a breakdown of surface coatings allied to the tendency of these areas to remain damp thereby creating an electrolytic environment.
The iron fixings in the stonework may not be easily accessible and this can make maintenance and repair difficult. It is even more essential then that these areas are regularly inspected so that maintenance, painting, and repair can take place before the situation becomes critical.
The use of resins for fixing can be an acceptable alternative for historic ironwork. They adhere to both the iron and the stone, are easy to use, strong and create a water tight seal. There is no risk of strain on the stonework from the fixing process as there is no caulking required. It should be recognised that this is relatively recent technology (certainly when compared to lead fixing) and there may be difficulties associated with this system which have yet to come to light. Also, it should be acknowledged that part of the ethos of conservation is to retain not only the design and materials but also the skills and processes involved in the original work.
REMOVING LEAD-FIXED IRONWORK
There is no easy way to remove ironwork from masonry and the process is likely to cause some damage to the surrounding stone. If possible, remedial work should therefore be carried out in situ using the National Heritage Ironwork Group (NHIG) principles of minimum intervention (see Further Information).
 |
|
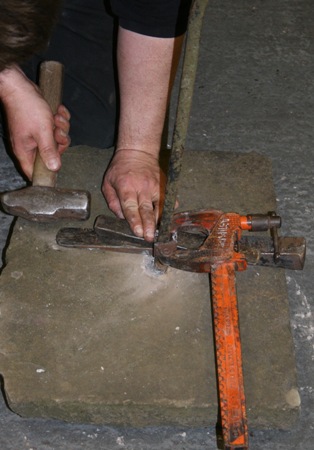
| Using a clamp and wedges to lift paling (Photo: A Legge) |
Where removal cannot be avoided, the first step is careful inspection to see if the ironwork can be deconstructed by removing screws, bolts, pins or wedges, and to check the condition of the surrounding stone. If the masonry is already so badly damaged that it must be replaced, for example as a result of rust expansion, cutting the masonry is the easiest option.
Otherwise the next step is to remove the lead from the joint. This is best done by chain drilling holes around the bar with a slightly smaller diameter than the width of lead. Using a slow speed drill and moving the bar as the lead is removed will compress the lead, which can then be drilled again. The use of a small, thin chisel may be useful to act as a gouge, but it is inevitably a slow, tedious process and may not be a viable option in areas which are difficult to access.
Once the lead has been removed, attaching a clamp to the iron bar and hammering metal wedges between it and the stone will gradually lift it up. A piece of wood can be used to protect the masonry.
Removal can be complicated because the holes are often dove-tailed at the base and the bar is often ‘ragged’ (chiselled) or ‘upset’ (thicker at the embedded end). It may be possible to remove the ironwork with the stonework still attached, for example in the case of railing capstones.
Occasionally railings are set in holes that extend all the way through the capstone, enabling the lead to be melted out from the underside. Any spalling, which can easily be caused by the heat, would be hidden within the cemented joint when the capstone is re-fixed.
Where access is difficult and all other methods fail, the only option may be to cut the ironwork to allow access to drill the lead out. The ironwork would then have to be repaired.
HEALTH AND SAFETY
While lead has been used for centuries, today attention must be paid to the associated health and safety and environmental hazards when using this material and its compounds. The Health and Safety Executive (HSE) provides excellent advice on working with lead (see Further Information).
It is highly likely that any historical paint will be lead-based and any dust will be hazardous to people in the vicinity and to the environment. Dust should be collected with a powerful vacuum cleaner that has a recommended filter system. Dust and debris should be collected in sealed containers and disposed of at an approved recycling centre. Any waste lead can be re- melted and used again.
When using molten lead there are associated fire risks and care must be taken not to overheat the lead creating a lead vapour that could be inhaled. Personal hygiene is paramount and no food or drink should be consumed in the immediate area. Practitioners should use recommended personal protective equipment (PPE) including face-masks, overalls and disposable gloves. Dedicated overalls should kept for working in the designated lead working area to prevent contamination.
People who regularly work in this environment should have the amount of lead in their blood monitored by having tests carried out at least every six months. This can be carried out by a GP and it is very important that the amount stays below the recommended level (see HSE and NHIG guidance in the Further Information section).
 |
 |
 |
||
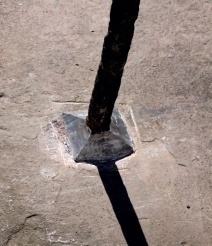
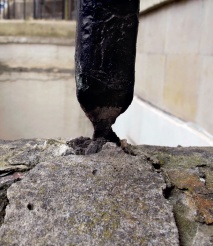
| Left: A well-defined caulked joint (Photo: P Smith). Centre: Cracked plinth caused by corrosion and rust jacking (Photo: A Theale). Right: Cracking caused by over-caulking (Photo: A Legge) | ||||
REINSTATING IRONWORK
When ironwork is to be fixed into new masonry, fixing holes should be made using a non-percussive system such as a diamond drill which will reduce the risk of damage from vibration. Drilled holes have smooth sides which offer little adhesion to the lead. Drilling angled holes creating a bell-shaped bottom to the hole or chiselling it square will create an effective key for the joint. All dust and debris must be removed from the hole, usually blown out with an air pump. ‘Ragging’ the iron bars can help to provide a key for the lead to fix to.
It is essential that the holes are kept clean and dry. If moisture does find its way into any of the holes they can be dried out by resting a heated bar in them. Molten lead poured into a wet hole will very quickly generate steam and the pressure will spray the hot lead out. This represents a significant hazard and the wearing of full PPE including a full face mask is essential when lead pouring. Iron which is to be leaded-in should have a surface finish applied (such as lead-based or linseed oil paint) before it is placed in the socket to provide an extra level of corrosion protection. Molten lead solidifies and chills quickly so the surface finish should remain intact.
Once the iron to be fixed is in position, a clay bund can be made around the bar and the area cleared ready for pouring. The lead melting area should be safely away from the work area and should be fenced off. Molten lead is poured into the hole with a small ladle. It is important to ensure that enough lead is poured in because it shrinks on cooling.
Once the lead has cooled, the clay bund can be removed and any excess lead removed with a chisel. The lead can then be caulked down to form a smooth tapered surface. A piece of oak tapered to approximately 12mm square on the end grain and cut at a slight angle makes an excellent finishing tool. It is held lightly on the surface and gently hammered to produce a smooth, well-defined joint.
Experience has shown that these lead fixings, if properly executed, should survive for centuries.
~~~
Further Information
M Boultwood and J Adkins, ‘Lead and You’, NHIG, 2013
Health and Safety Executive, ‘Working Safely with Lead’, 2012
NHIG, Conservation Principles for Heritage Forged and Cast Ironwork, 2013