
Historic Leaded Lights
Stephen Clare
 |
||
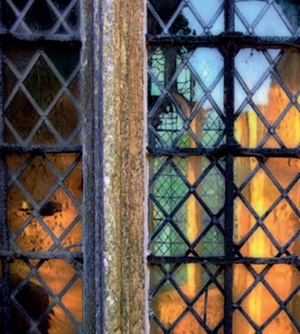
| Leaded lights at St Kenelm’s church in Minster Lovell, Oxfordshire (Photo: Kate Mellersh) |
This is an exciting time for glass conservators in England, with several large projects involving internationally important glass in progress. These include the major works by York Glaziers Trust to York Minster’s resplendent Great East Window by John Thornton (c1405), the 16th-century Belgian glass from Herkenrode Abbey imported by Brooke Boothby to the Lady Chapel at Lichfield under the care of Barley Studio of York, and the ‘Tree of Jesse Window’ (c1340) from Wells Cathedral, presently being conserved by Holywell Glass of Wells. Complex interdisciplinary collaboration between glass conservators, conservation scientists and art historians has led to significant progress in this field and it is not surprising that stained glass conservation has held centre stage.
However, the majority of our heritage in glass does not comprise such significant painted, stained or enamelled glass, but plain or ‘quarry’ glazing with simple, diamond-shaped quarries of glass set in a lattice of lead. The quality and beauty of these humble leaded lights can be arresting, whether in a country cottage or a medieval church. Growing appreciation has led to greatly improved custodianship, not least because so much has already been damaged or replaced through ignorance of historic methods and materials.
It is vitally important that we now pay proper respect to the substantial amount of plain glazing which has survived and do not neglect the basic methods of site fixing, maintenance and repair which are essential to its proper care. (Many of these principles are of course common to both leaded lights and stained glass.)
Likewise, historic plain glazing demands the same level of documentation as stained glass. While there is often no need to prepare conservation diagrams for each panel, key areas should be carefully documented and original glass and lead described diagrammatically, which is straightforward with modern computer software.
The importance of high quality, first level training cannot be overstated. Just as conservators cannot function with any degree of authority without first developing high-level craft skills, it is equally essential that conservation awareness and sensibilities, as well as a knowledge of historic materials and methods, are introduced to trainees at a very early stage irrespective of whether their work will involve plain leaded lights or stained glass. It is equally important that qualified highly skilled leaded light makers and fixers are given the respect they deserve.
In the conservation and restoration of plain glazing, the most important factor in securing the survival of historic glazing is knowledge of materials and appropriate techniques. Although this can be complex, there are a few key elements to consider which are set out below.
TRADITIONAL AND MODERN TYPES OF WINDOW GLASS
Knowledge of glass types and manufacture is essential so that important survivals are recognised and conserved. By understanding the qualities of original glass – its thickness, brilliance, texture and so on – the best possible decisions can be made concerning replacement when conservation is not possible.
Mass-produced sheet glass
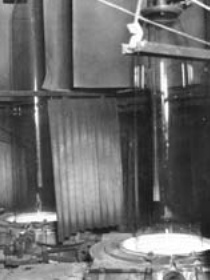
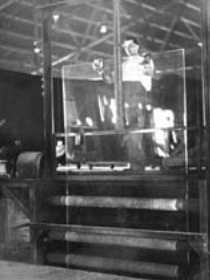
Generally the most common types of sheet glass throughout the 19th and 20th centuries were made by the drawn cylinder method or the Fourcault process (below left and centre).
The drawn cylinder process, developed in America in about 1830, was basically a mechanised and hugely expanded version of the ancient cylinder process, which is described later. A metal hoop was placed in the molten glass and drawn upwards while compressed air was blown into the glass tube. The cylinder of glass was enormous, often drawn up to 40 feet in length before being transferred to a cradle. Here it was cut into manageable sections with a hot wire or diamond. These smaller sections were then opened out into sheets by reheating and cutting them from one open end of the cylinder to the other, in the same way as traditional cylinder glass.
 |
 |
 |
| Left: the drawn cylinder method, centre: the Fourcault Process and right: the disc of glass or ‘crown’ that gives crown glass its name | ||
The Fourcault process, developed in the first years of the 20th century in Belgium, was a continuous flat drawn sheet process. In essence, molten glass was forced through a slotted section of a fire-brick float sitting on the surface of a large vat of molten glass. The float was forced below the surface of the molten glass to begin the process. Hydrostatic pressure forced a flow of molten glass through the slot; it was then gripped and drawn upwards by rollers and cut into sheets as it solidified higher up.
It is very difficult to identify these mass produced sheet glasses: experts will confirm that there is a regular but subtle wave across the sheets but this is extremely difficult to distinguish when it has been cut into small quarries. However, surface movement will be present and can be picked up by careful observation.
Cylinder glass is the best replacement for mass-produced sheet glass, but should be selected to avoid irregularities or ‘reams’ as the cylinder glasses now available have a largely regular surface with only slight imperfections. Another option is to use horticultural sheet, a type of glass imported from Eastern Europe, which can be successfully introduced (this is probably still produced by the Fourcault process.)
It is important that care is taken to match the thickness and brilliance of the original glass, as well as carefully observing any slight tint in the glass, which should be matched.
Machine-rolled glass
These textured glasses, often referred to as ‘cathedral’ glasses, are produced by continuous process and passed through water-cooled rollers to impart texture. They have been in constant production since 1888 with frequent changes to pattern and colour ranges. As many variations are now obsolete, these glasses can present difficulties to the conservator. However, many modern textured glasses are produced on a large scale in America and China, with European manufacturers such as Lamberts also producing a range of cathedral glasses.
The trade names for these ranges vary and include ‘bulls-eye’, ‘spectrum’, ‘kokomo’ and ‘antique cathedral’. It is important to research availability and keep abreast of changing ranges.
Because certain glass types are no longer available, some of the conservation methods discussed later, such as edge bonding, copper foil repair, and the insertion of fine repair leads, are now having to be used on modern machine rolled glasses just to retain original material. In effect, the ‘discard and replace’ attitude formerly applied to machine rolled glasses is properly under revision.
Broad glass and early cylinder glass
The traditional methods used to make both ‘white’ and coloured sheet window glass have been in constant use since at least the 11th century. (Early glass is too strongly tinted to be described as clear. Called ‘white’ glass, its colour is actually greenish.)
 |
||
| Broad glass window at Godolphin House, Cornwall, c17th century (Photo: NT) |
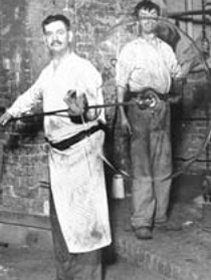
A gather of molten glass on one end of a long blowpipe is inflated by mouth and swung to draw the growing bulb out centrifugally into a cylindrical shape with parallel sides. The end furthest from the blowpipe is then opened, usually with the help of an assistant who pierces the end of the cylinder and works the opening into shape as the blower rotates the pipe. The other end is then separated from the blowpipe by the blower.
In the earlier broad glass method, the cylinder was then cut along a long edge and flattened into a sheet on a stone bed while still hot and plastic by pushing it into place with iron and wooden tools. The marks of this manipulation are often visible.
Cylinder glass is merely a refinement of the broad glass process. Larger cylinders are blown and allowed to cool. They are then cut with a diamond along their length and reheated to form sheets, thoroughly flattened by ‘ironing’ with a heavy block of damp hardwood onto a bed of stone, metal or glass according to the glasshouse. It is then ‘annealed’, gradually cooled under controlled conditions in a ‘lehr’, a tunnel-like oven though which the glass is slowly moved. The process removes stresses, making the glass less likely to shatter when cut.
Broad glass production methods were generally less sophisticated than cylinder glass and the pieces are relatively small. The glass varies greatly in thickness across the sheet and for white glasses has a pronounced greenish tint. There are also frequent bubbles and imperfections. ‘Stones’ are often trapped in the batch – these can be larger sand particles from the glass constituents, or pieces of the pot in which the glass was smelted. Nevertheless, this glass is extremely attractive and rich when formed into leaded lights.
The surface of broad glass is often corroded. The fact that much of this glass is high in potash, often with impurities present in the batch constituents, allied to furnace technology (which often did not achieve a homogeneous mass in the pot) contribute to this.
Broad glass should always be conserved and repaired as the first option. Where replacement is necessary, cylinder glass should be used. If the glazier’s stocks cannot match the glass, several of the European glass houses will match glasses with great accuracy.
A close match can normally be found by referring to old stocks, but be aware of the differences between the early and modern cylinder glasses.
Old cylinder glass too should be conserved by repair wherever possible. If replacement is unavoidable, use modern cylinder glass. It is still produced in the UK by English Antique Glass Ltd, in France at the great glasshouses of Verriers St Just, in Germany by Glasshütte Lamberts and in Poland by Tatra Glass.
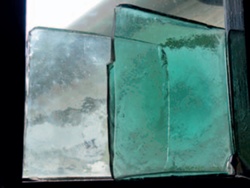
 |
||
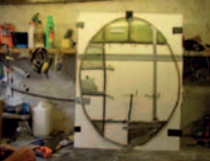
| An example of 18th century crown glass plain glazing dismantled on site following collapse. All glass was retained and was original. Copper foil repairs were carried out. |
Crown glass
The other main historic method of sheet glass production results in crown glass. This has great brilliance because the glass is not formed on a bed of stone, glass or metal so both faces retain their smooth fire-finish.
In this process the gather of glass was blown into a large bubble, then manipulated into the form of a wide-bottomed decanter. A solid iron rod or ‘punty’ was then attached to it at a point opposite the blowing iron by dipping the punty into molten glass and fusing it to the gather. The blowing iron was then detached and the end of the bubble opened out to form an aperture. This opening was then presented to the fierce heat of the furnace until almost molten, then spun rapidly, unfurling into the familiar disc or crown of brilliant glass (above left). These varied greatly in size: medieval coloured bullions were small, only a foot or so across, but at the height of crown glass production in the 18th century huge crowns were blown, often six feet across. These became very thin at the outer edge, often less than 1mm thick and possessing great clarity and brilliance in these thinner areas.
As crown glass is no longer made, cylinder glass is the only suitable replacement, but it must be carefully selected for thickness and tint. Specialist glaziers buy up stocks of very thin cylinder glass when available and will commission specific batches for projects to ensure the best match for crown glass. An example is the important stable block at Stoneleigh Abbey, Warwickshire, for which Verriers St Just blew very thin cylinders of a particular shade of blue to special order for Holy Well Glass, ensuring an excellent match with surviving quarry glazing.
For sash window glazing, where the distinct curvature of the crown is much more visible than in the smaller pieces in leaded light glazing, it will be necessary to curve the glass under heat on a kiln former to achieve the correct appearance. The London Crown Glass Company can provide carefully selected heat-formed curved cylinder glass where larger amounts are required.
 |
||
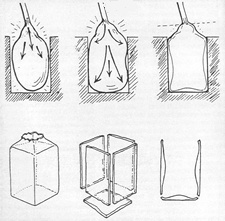
| Production of slab glass (Diagrams reproduced by kind permission of Peter Cormack FSA) |
Slab glass
The final sort of glass commonly encountered is Norman slab glass, which was blown into rectangular moulds as a bottle before being cut into small panes when cold. The thickness of the glass, ranging from very thick at the centre of the pane, to very thin at the edges, transmits light in a particularly rich fashion. The use of spectacularly coloured slabs in work of the Arts and Crafts period is well known, but this glass was also used to great effect in plain glazing.
For repairs, carefully selected cylinder glass, sometimes ‘plated’ (fixing two or more layers of glass together) to achieve the necessary depth, can approximate slab glass. However, there is no substitute for approaching a conservator who holds old stocks. It is also possible to commission new slab glass. English Antique Glass will produce slab glass to match the original if sufficient is ordered.
REPAIR METHODS
Resin edge bonds
While the method selected should be carefully considered to suit the situation, in broad terms edge bonding with epoxy resin is not generally suitable for the repair of plain glazing. This is because resin edge bonding is far more fragile than other available methods of repair. It was developed for museum use and while often employed in the conservation of important stained and painted glass, the bonds are usually protected by protective glazing in some form. Without such protection window glass is exposed to the elements and tends to be worked hard. Casement panels may be opened frequently, but even fixed lights are subject to wear and tear and local damage is common.
However, in certain situations, such as the repair of crown glass in sash windows where applied repair methods may be unsightly, or where a particularly beautiful section of glass has multiple cracks but remains intact, in situ resin bonds may be a sensible choice.
In situ resin bonds can also be employed in such situations as a useful temporary repair, conserving shattered fragments in situ pending future conservation.
The crack is cleaned and degreased by irrigating with acetone on a cotton bud and the resin is introduced with a scalpel tip. The resin pulls along the crack under capillary action, which can be monitored with an eyeglass to ensure a full flow.
To ensure that the resin cures properly it should be measured accurately by weight on a digital balance. The preferable epoxy resin for this purpose is Araldite 20:20, which is a more predictable material over a slightly wider temperature range for in situ repair than some other resins such as HXTAL NYL-1. In situ resin works should not be carried out in cold conditions or towards the end of the working day as wide temperature fluctuations are more likely overnight.
In studio-based conservation, resin residues are cleaned thoroughly and all repairs marked clearly on conservation diagrams. For in situ bonds, however, there is an argument for leaving the tiny bead of resin at the point of application to serve as an indicator for future artisans that the resin bond has been carried out.
Repair leads
Honest and reversible repair methods are preferable for plain glazing. The insertion of repair leads or strap leads is good practice, conserving original material. However, there is no reason why this sort of repair should be clumsy and detract from the appearance of original lead lines. There should be a hierarchy of leads, separating original lead lines from later repairs. Lead sections are available in a huge variety of sizes, or can be custom milled in-house. A sensitive, considered approach to the insertion of repair leads is easily achieved, although often neglected.
 |
||
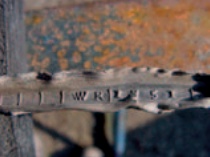
| The date 1751 and the manufacturer’s initials (WR)
were clearly visible in this original lead from the
18th century panel shown above. As much of the
original lead as possible was conserved and lead was specially milled for the remainder. |
It has been common over the centuries for glass to be cut or ‘grozed’ (the edges nibbled away with a notched tool or pliers) to accommodate the ‘heart’ of the lead (the crossbar of the H section). However, this rather defeats the object of conserving the original glass. It is possible to order lead from suppliers with a very slender heart to avoid removing glass. Alternatively, it is simple to make a draw-tool with a sharp cutting edge to remove shavings of lead from the heart. Only a very small thickness is required; repair leads usually serve the purpose of retaining original material and are not structural, so slim, tailor-made leads are appropriate.
There is a distinction between repair leads inserted when a panel is dismantled in the workshop (middle left) and ‘strap’ repairs, where a crack is covered by a strip of surface lead applied in situ.
Strap leads should be soldered in place, which is easily achieved with a small electric or butane gas soldering iron. A tiny sliver of lead is removed with a scalpel to reveal bright metal and fluxed. The tip of a small iron will readily solder the repair lead in place.
Historically strap leads were often applied on both sides and ‘glued’ into place with blackened linseed oil putty, however, unless leads are required on both faces to stabilise loose fragments, a lead on the exterior face only with a little blackened putty forced under the lead, but not into the crack, and trimmed off neatly, can suffice. This means that the weather is kept out, but when the panel is next re-leaded, the trauma to the glass through mechanical removal of hard putty is minimised.
Copper foil repairs
The copper foil or Tiffany method was developed in America by Tiffany and La Farge in about 1880. It has been employed for over 30 years for the discreet repair of broken fragments of stained glass.
 |
||
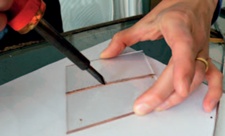
| A copper foil repair |
In this method a very thin sheet of copper with an adhesive backing is applied to each side of the crack and neatly trimmed back with a scalpel. The pieces are then brought together, fluxed and soldered with a small soldering iron. The same process is carried out on the reverse, resulting in a tiny H-section repair akin to a miniature lead. The repair can be darkened by applying chemical patination to make it blend in with the leaded panel, but the solder oxidises and darkens with time anyway.
There are some justified concerns about its use for painted and stained glass as great care needs to be taken when trimming back the copper foil to avoid scoring the glass surface with the scalpel tip. The reaction of heat, fluxes and chemical patination in close proximity to delicate glass surfaces and painted surfaces is a further cause for concern. Nevertheless these issues are being addressed by conservators and the method remains a valid option as an honest and readily reversible repair method.
For plain glazing, the copper foil method is an excellent choice, the scoring of the surface can be readily avoided by careful application and the repair is both discreet and reversible. Because the foil is so thin there is no need to remove any glass to facilitate the insertion.
It should be remembered that copper foil repairs can often be carried out in situ when fragments of a broken piece can be teased out, allowing copper foil to be applied to the edge of cracks. Even in exposed positions when external access may not be possible, the fact that solder is readily drawn through to the other side of the foil can make this viable.
This method can also be seen as an excellent temporary repair for the retention of original material pending future conservation.
 |
||
| The brilliance of slab glass |
Re-leading
This is a crucial part of the process. If the wrong decisions are taken about the lead profile, the whole balance of a window in its architectural setting can be destroyed. For example, Arts and Crafts period slab glass is normally set into substantial round-section leads. To re-lead in thin, flat-section lead would radically alter the external texture of the building.
In the same way, 18th-century plain glazing formed of very thin crown glass should be re-leaded in flat-section lead with a heart depth matching the original. This can be as little as 1.5mm and must be custom-milled to ensure an authentic appearance. But it is not merely a question of appearance: panels from this period were normally of very light construction and held to a very substantial iron frame (or ‘ferramenta’) with lead ties. The panels overlapped one another.
This dynamic can easily be upset if the panels are made too heavy, leading to premature failing of ties and water ingress, not to mention an overly heavy external appearance. In plain glazing such niceties are important – they are the difference between success and failure.
Obviously, historic lead such as medieval cast sections and later sections with historically significant date markings should be conserved wherever possible, or at the very least thoroughly documented.