
Pointing with Lime
Craig Frew
 |
|
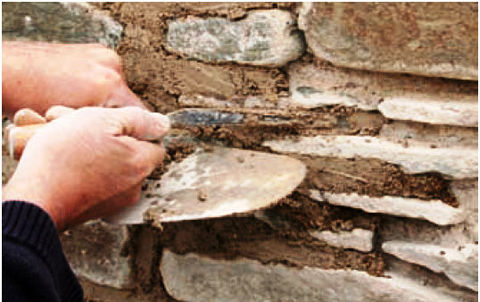
| Joints being filled with a suitable mortar mix, compressing the mortar back well into the depth of the joint and bringing the pointing flush with the masonry face |
Traditional mass-masonry wall construction (which includes most walls built before 1919) works on the basis that moisture entering a wall is able to escape as water and water vapour as easily as possible. Lime mortars can readily handle the transmission of water and water vapour between the inside and outside of a masonry wall, owing to the complex interconnected pore structure of masonry.
The use of cement mortars is widely recognised as being detrimental to such buildings and structures as they can drastically alter the way in which a wall handles water and water vapour. Cement mortars tend to have a consistent and 'closed' pore structure that traps water rather than allowing the building to breathe (not necessarily a problem in modern cavity wall construction). Any trapped moisture will expand if subjected to freezing conditions, and mortars may ultimately fail, often causing damage to the surrounding masonry in the process.
Masonry walls need to be maintained and repaired, just as roofs and rainwater goods do. Where walls are solid, without a cavity, keeping them in good repair is necessary for the interior to remain functional and dry. Pointing is the most common repair, and often one of the most poorly executed.
The two main reasons for lime-pointing repairs are:
- The original lime pointing has decayed over time and needs to be replaced. This may be the result of gradual decay through weathering, or failure as a result of poor maintenance. Blocked gutters or overflow pipes, for example, lead to damp masonry and can result in frost damage.
- The masonry has been re-pointed with a cement-based (or other inappropriate) mortar at an earlier date, which is causing problems to the building and/or the adjacent masonry and must be replaced with a more appropriate mortar.
TRADITIONAL MASONRY DETAILS
Traditional walling, whether ashlar or rubble stonework or brickwork, is generally built straight and plumb, with joints struck off or pointed flush with the masonry. This assists with rainwater run-off, thereby keeping the wall as dry as possible. Because mortars, in principle, should be sacrificial to the masonry substrate, they normally weather at a faster rate, forming open or recessed joints in the masonry.
While open joints and recessed mortar pointing are often a result of natural weathering, there is also a relatively modern 'fashion' for reinstating recessed pointing, in some cases significantly recessed from the face of the masonry. This bears little resemblance to the original character and appearance of mortar joints in traditional walling and, in effect, provides ledges on which water can collect. This reduces the weather-proofing ability of the wall and encourages additional moisture to enter the masonry units and mortar joints.
Old lime mortar is often raked out and replaced when it is perfectly sound: it is a common misconception that the softness of existing lime mortars is a sign of failure. Most historic mortars are inherently weak and can break or crumble when disrupted. Furthermore, 'hard' mortars are not necessarily the most durable: in fact the opposite appears to be the case. Research by A M Forster at Heriot Watt University (2003) identified a relationship between the hydraulicity of lime mortars and their water vapour permeability, and it is now generally accepted that lower (compressive) strength mortars are more likely to have higher rates of vapour permeability.
Vapour permeability is essential for any mass-masonry walls to remain dry and functioning as intended. Where defective or open mortar joints do exist, these can easily be pointed with an appropriate and compatible mortar, to match any existing or original mortar in colour, texture and performance.
DEVELOPING A REPAIR STRATEGY
In conservation repair work, it is imperative that an understanding of the building or structure is gained before specifying and undertaking any works. For lime-based works this is particularly important. An original mortar might have inherent defects. Buildings and their surrounding environment may change over time: for example a residential building may now be a roofless ruin. Repair mortars can, and sometimes should, be designed to perform in a different way from original mortars to meet new performance requirements.
The first stage, prior to starting any pointing work, should always be a close inspection and a survey of the existing masonry walls and their condition. This should identify and differentiate between any original mortars and later repairs. If possible, any inappropriate mortars which are causing accelerated decay of the adjacent masonry should be removed and replaced with more appropriate materials. Sound, original mortars should be left in place: the principle of minimum intervention applies equally to pointing as to other conservation repair work.
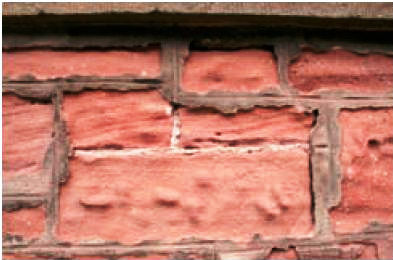 |
|
| Victorian squared rubble sandstone walling which has been repointed in a modern dense cement-based mortar, accelerating its decay, particularly at the stone/mortar interface. |
If sound original mortars are found, these may provide evidence of how the joints were originally finished. In most cases, joints will be flush with the masonry face, but there may be evidence of 'lining out' or colouring of the mortar, for example, which should be fully investigated. Such evidence, when properly understood, should be used as a guide for repair work. Appropriate and representative mortar sampling and analysis can reveal the constituents of original mortars and assist in developing compatible specifications which will closely match the colouring and texture of the original mortars. Difficulties matching original mortar should never be used as an excuse for removing sound original mortars as, with experienced interpretation and an understanding of the relevant factors, it will always be possible to achieve a suitable match.
In many of our oldest buildings, ordinary brickwork and rubble stonemasonry were finished with an external coating of lime (a render or harling) and often limewashed. Evidence of such finishes can often be found on closer inspection of the walls. However, Victorian rubble masonry was often intended to be left exposed, as was fine brickwork of all periods.
Lime coatings were as much functional as decorative, and where such coatings are removed these can often reduce the 'weatherproofing' (not 'waterproofing') ability of the wall to keep the inside of buildings dry. Clear evidence of their use should always move the emphasis away from pointing and onto reinstatement of the coating itself. The appropriate specification and application of such coatings are critical to ensure the walls function as originally intended. Specialist advice can be sought where it is not clear what the original wall finishes were, to avoid a conjectural restoration approach.
MATERIALS SPECIFICATIONS
Characteristics of repair mortars should always be based on holistic evaluation of the building, which can then lead to the determination of performance requirements for the specific situation. Performance requirements cover a range of issues including the durability of the mortar, its ease of use and compatibility with original and/or other surviving historic materials. In some cases there may be a conflict between specific requirements, and judgement will be required in achieving a final specification. To determine whether new materials will be compatible with surviving historic materials, information on both old and new materials must be available. Analysis of surviving historic mortars should be carried out to provide relevant information on their constituents and performance. Technical information and performance data available for new materials can then be evaluated against information on existing materials. Issues to consider include the material's performance in use, ease of application and compatibility.
PERFORMANCE IN USE
The hardened mortar should have:
- Adequate vapour permeability
- An appropriate degree of capillarity for the proposed use
- A water absorption rate not significantly greater than the host substrate
- An elasticity that reflects the built condition and scale of the works
- Sufficient tensile strength to suit the construction requirements
- Compressive strength to suit the construction requirements (usually quite low)
- A bond strength sufficient to achieve a good wind- and water-tight bond, never greater than the host masonry, nor so feeble as to result in the separation of the mortar, leading to capillary ingress of water at the masonry/mortar interface.
EASE OF USE
The mortar should:
- Have appropriate workability characteristics when fresh to allow the work to be undertaken correctly
- Remain workable for a sufficient length of time to allow appropriate finishing
- Achieve an adequate degree of frost resistance at a sufficiently early age to avoid potential freeze/thaw risk.
COMPATIBILITY WITH ORIGINAL HISTORIC MATERIALS
The hardened mortar should:
- Have a vapour-permeability similar to, or greater than, that of adjacent historic materials
- Be visually compatible with surviving mortars and/or with the original appearance of the building
- Reflect the historic integrity of the original materials and methods of construction where practical.
CHOOSING THE RIGHT BINDERS AND AGGREGATES
Lime binders are available in a wide range of types, suitable for different applications and locations. The two main types are nonhydraulic and (natural) hydraulic limes. In line with the classification of cements, building limes are classified by BS EN 459-1:2001 in terms of compressive strength (N/mm2 at 28 days).
Non-hydraulic lime and sand mortars are most commonly made from a lime putty containing at least 90 per cent calcium lime (CL90). CL90 dry hydrate (commonly known as builders' lime) is generally used as a plasticiser in a cement mortar (1:1:6 or 1:2:9 cement: lime: sand mortars), and is not generally suited to making lime/sand mortars. This is because lime (calcium hydroxide) carbonates by reacting with airborne carbon dioxide (to become calcium carbonate) in the presence of moisture. This reaction is part of the curing process. If supplied as a lime putty, the lime is protected from the air because it is saturated with water, and covered with a film of water from the moment it is made. In its dry hydrate form, on the other hand, the lime is supplied in bags or sacks as a dry powder, and some premature carbonation is inevitable. Its performance is therefore less predictable.
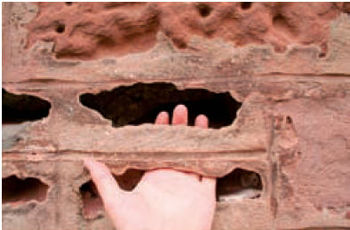 |
|
| Here the stone has weathered back completely, leaving a 'lattice' of cement pointing visible. |
Natural hydraulic limes (NHLs) come in a range of strengths from NHL 2 (feebly hydraulic) and NHL 3.5 to NHL 5 (eminently hydraulic), which are suitable for a range of different applications and building elements. NHLs come as a dry hydrate powder (as with cement). It should be remembered that while strength development is relatively fast for cement mortars, lime mortars strengthen over a much longer period of time, and this must be taken into account when specifying work.
The correct choice of aggregates can be critical to the success of a lime mortar. Aggregates should always be well graded and varied according to the joint widths. Generally, the maximum aggregate particle size should be around one third of the joint width. Particle shape also affects cohesion, and sand should be sharp. BS EN 13139:2002 Aggregates for Mortar is the current standard, rarely referred to, which replaced the more familiar BS 1199 and 1200:1976. Aggregates must be suitable for their purpose, whether for new work or for conservation repair work, and this is the first priority. However, achieving a visual match is also essential, particularly where old and new mortar are to co-exist, as in patch pointing. Texture as well as colour is therefore important, and for best results the aggregate of the existing mortar should be analysed and graded.
The choice of aggregate will also affect the mortar mix ratio, since particle shape and grading will change the void ratio. In principle, there must be sufficient binder to bind all the aggregate particles together: too little binder will result in a weak mortar with high capillarity and poor workability, too much binder will increase the risk of shrinkage cracking when the mortar dries out. Typically, a nominal volume ratio of one part binder to 2.5 or three parts of sand would be expected where a sharp, well-graded concrete sand (5 mm down) is being used. The minimum binder to sand ratio can be checked by calculating the void ratio of a particular sand. This can be achieved simply by drying a sample of aggregate and then measuring the amount of water required to fill all the voids.
WORKING METHODS
Pointing is a 'top-down, bottom-up' process. Clearing out and preparation of joints should always be carried out from the top down, and pointing should be carried out from the bottom up to take account of the effects of gravity.
Any cementitious or other non-original and inappropriate mortars should be carefully removed, avoiding damage to adjacent masonry. If a cementitious mortar cannot be removed without damaging the masonry, consideration should be given to leaving it in place. Defective lime mortars (those which are friable or have become detached from the adjacent masonry) should be raked out to a sufficient depth where sound mortar exists. However, care should be taken to ensure that sound, original lime mortars are left in place, in accordance with the principle of minimum intervention.
Where masonry is relatively impervious and a suction bond may be difficult to achieve, joints may need to be raked out further, (say) at least twice the depth of the joint width, to provide a level of mechanical anchoring of the new mortar into the joint.
Hand tools such as plasterers' small tools, half hacksaw blades and specially made steel hooks can be used to avoid damage to the stone arrises and widening of the joints. Large chisels and any tools wider than the joint width itself should not be used. The use of power tools is frowned on by many conservators, but they should not be completely disregarded. There are some power tools available now which can be used successfully to remove existing mortars (particularly where cementitious), such as those with oscillating blades. However, where historic masonry is concerned they should only be used by the most highly experienced craftsperson owing to the ease and speed with which they can damage masonry.
All loose and friable material must be removed prior to placing new mortar, as it requires a sound surface to adhere to. A stiff bristled brush should be suitable for clearing stone surfaces of unwanted material, followed by lightly spraying water (not under high pressure) into the joints to remove any remaining dust and debris. Preparation of the wall surfaces generally should include thorough cleaning down and removal of all loose material, dust, etc, and damping down before starting work.
Control of suction between the new mortar and the substrate is required. The more absorbent the stone or brick, the more wetting down it will need, in order to prevent water being drawn from the newly-placed mortar into the stone. If too much water is lost, the mortar will shrink excessively, become friable and ultimately become detached from the substrate. Impervious stones may require minimal or no damping down.
For re-pointing, the mortar should be sticky but not wet. A suitable mortar should stick to the underside of an inverted hawk (or trowel). An appropriate pointing tool should be chosen to suit the width of the joint, thus preventing spreading of mortar or staining on the masonry faces. The mortar should be firmly pressed into the depth of the joint with the pointing tool. Where pinning stones exist (normally found in rubble-stone mortar joints over 10-15 mm) they should be hammered in any joints to force the mortar well back into the depth of the joint and to reduce the volume of mortar present in one location.
In general, when mortar has stiffened up, it should be firmly compacted into the joints by beating with a stiff bristle brush. This will help eliminate any initial shrinkage cracking and ensure that the mortar is fully compacted into the joint with a good bond to the surrounding masonry. The surface should then be lightly scraped back with the edge of the pointing tool or similar, to provide a rough, open-textured surface which is ideal for carbonation and curing, and for maximum evaporation of moisture from the joints once fully cured.
Overworking the surface of the mortar will result in surface laitance caused by lime particles being 'worked' to the surface, and forming an outer crust which may restrict carbonation of the mortar behind. This can also result in lime leaching if subjected to rainfall before the mortar has sufficiently cured.
Sample panels of pointing should always be produced at an early stage in the contract, as these will serve to clarify final details of specification, define the standards of workmanship and finish, and provide control samples for guidance of the contract work.
CURING AND PROTECTION
All mortars require adequate protection until they are fully cured, and inadequate protection is a common cause of failure in lime work. These mortars should not be expected to cure as quickly as cement-based mortars.
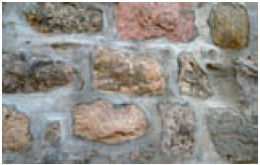 |
|
| Granite masonry with poorly executed cement pointing; an attempt to lightly rule some horizontal joints (albeit in a random fashion) does little to take the eye away from the rather synthetic grey/blue colour typical of OPC mortars. |
In drying conditions, new lime pointing will need to be dampened regularly (by lightly spraying) to prevent rapid drying. Over-rapid drying will result in shrinkage cracking due to rapid loss of water and will inhibit curing because the lime will only react with carbon dioxide in the presence of moisture. For hydraulic limes, retention of moisture within the mortar for the first few days is critical to ensure that the hydraulic set takes place because its hydraulic constituents react with water itself: thereafter, the remaining carbonation set requires cyclical light damping and slow drying.
The length of time required for the mortar to cure is also variable and will depend on environmental conditions, type of mortar used, its finish, and the mass of mortar in any one location. Curing can be accelerated by good working practices with pinning out and finishing joints (as described above). Adequate protection can usually be achieved by close covering the new work with hessian and polythene sheeted panels placed against the face of the new work.
In conclusion, it is ultimately the role of specifiers and users of lime-based mortars to ensure that appropriate materials and methods are used for the finishing of historic masonry walling, whether lime pointing or otherwise. Understanding the nature of traditional materials and building methods will assist by providing a starting point for developing suitable repair strategies and specifications, working within current legislative controls, taking account of the relevant philosophical issues and ensuring they are appropriate to modern day working practices. General advice and guidance for lime pointing must be approached with caution. It is important that regional, local and building specific variations are considered to ensure that local and vernacular traditions affecting the character and appearance of our historic built environment are fully considered. The use of standard specifications and solutions are clearly not suitable for lime pointing, as for other building conservation repair work.
~~~
Recommended Reading
- BS EN 459-1:2001, Building Lime: Definitions, specifications and conformity criteria, British Standards Institute, London, 2002
- Scottish Lime Centre Trust, Historic Scotland Technical Advice Note 1, Preparation and Use of Lime Mortars, Historic Scotland, (originally by Pat Gibbons, 1995) Edinburgh, 2003
- Stafford Holmes and Michael Wingate, Building with Lime: A Practical Introduction, ITDG, London, 2002
- Philip Hughes, SPAB Information Sheet 4, The Need for Old Buildings to Breathe, SPAB, London, 1986