
Scagliola Restoration
Michael Koumbouzis
 |
||
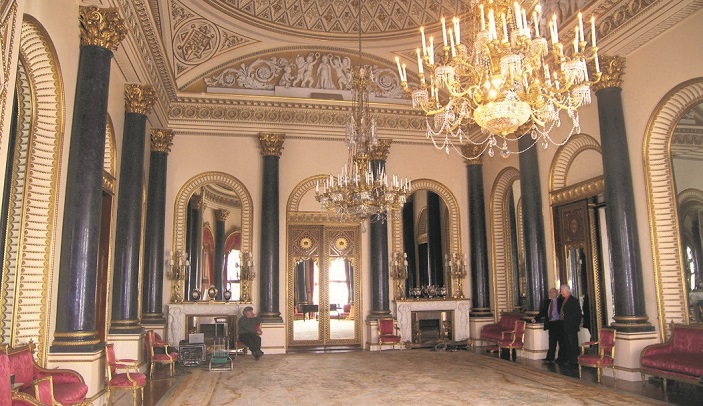
| The lapis lazuli scagliola pilasters in the music room before their restoration. |
Most conservation professionals will have heard of scagliola; some may even know how to pronounce it (with a silent g). But for those who know it really well, craftspeople and professionals alike, this intriguing technique is the undisputed Rolls Royce of interior finishes. It is a method developed in the 17th century for producing exquisite surfaces that replicate rare, extinct marble, or semi-precious stone. It is a highly versatile material that can take many forms: a wall panel, a full size column, a chimneypiece, an ornament, or even shaped into intricate inlays reminiscent of the Florentine sought-after pietra dura table tops. Under the hands of an accomplished scagliolist, the result will not only look but also feel exactly like the imitated marble, albeit a little warmer to the touch. It also develops a patina and a certain softening over the years which adds to its value and interest.
Scagliola is a refinement of a process used by the ancient Egyptians, Romans and Greeks. If a city could not afford the expensive white marbles of the time, they would render an inferior one with a white lime-based substance that could be polished as if it were an expensive one like the Pendelikon white marble from Attica.
Scagliola is made from plaster of Paris (a pure form of gypsum, principally calcium sulphate) with the addition of earth pigments, crushed minerals and other materials, carefully manipulated to create the desired effect. However, the exact process used by individual craftspeople remains shrouded in secrecy. When working on site, many of the earlier scagliolists would only work behind screens to keep inquisitive eyes at bay and to preserve the aura that surrounded this seemingly magical technique.
DETERIORATION MECHANISMS
 |
|
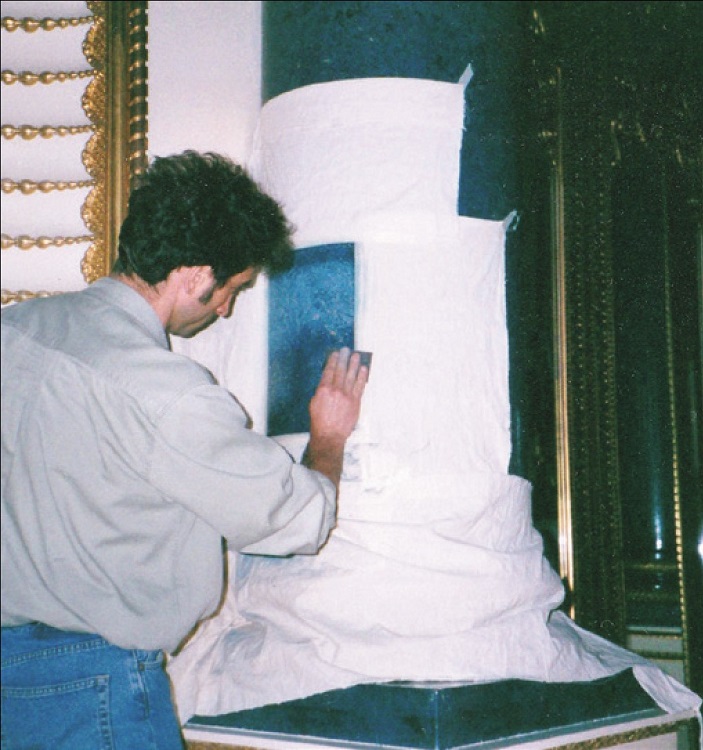
| The author working on the sample area in 2001. | |
 |
|
| The same sample area during a second site visit in 2008. |
Scagliola has many enemies, the most common one being moisture. Exposure to water and damp will cause staining or efflorescence (a bloom of salt crystals on the surface), resulting in a loss of surface polish while the plaster itself may become soft or powdery. Persistent leaks in the fabric of a building above can etch the surface of the material, making restoration particularly difficult.
Another common problem is physical damage caused by impact or movement in the structure or fabric of a building. Impact cracks to the scagliola are dangerous as they break the protective oil layers and open the surface up to moisture. Building movement may be caused by decay and deterioration, mild earthquakes and, particularly in London, WW2 bomb damage, causing cracks and losses to appear on architectural features such as columns which are bound into the structure of a building. However, it is the wear and tear caused by the passage of people which is perhaps the most common reason why scagliola surfaces have badly deteriorated.
While it is always best to conserve historic fabric as found, retaining the patina of age, a much greater degree of intervention is sometimes required to avoid the loss of the object’s architectural and artistic significance, particularly when it forms a key element of an important historic interior. Fortunately, where scagliola is concerned, most defects can be successfully repaired by capable and experienced hands, restoring the integrity of the original and allowing the intention of the artist to be fully appreciated. Detailed below are three very different conservation/ restoration projects which together illustrate some of the more common challenges faced by conservators. Each poses a complex set of issues that were solved through a combination of experience, dedication, passion and love for the art of scagliola.
BUCKINGHAM PALACE
An unusual and rather unique problem which was drawn to our attention many years ago related to pioneering regency work in the state rooms at Buckingham Palace by scagliolist Joseph Browne for the architect John Nash. These included a series of spectacular three quarter round pilasters in the music room which appeared to have been cut from solid lapis lazuli gemstone, and similar pilasters in the blue room which were originally a vivid crimson. The latter, however, had been painted over soon after installation to imitate a rather dull brown onyx, as the original colour had been deemed too rich for the taste of the time. As Thomas Creevey, an English politician, commented in May 1835: ‘…the costly ornaments of the state rooms exceeded all belief in their bad taste and every species of infirmity. Raspberry-coloured pillars without end that quite turn you sick to look at…’.
Unfortunately, the fine surfaces of the pilasters in both rooms had been slowly deteriorating for decades, and the problems had been accelerating during the later years, mainly due to public access to the state rooms, inadvertently introducing excess amounts of condensation. By now the beautiful surfaces of the columns had become pitted, had lost their original beauty and subtlety and it was suspected that this was a direct result of Joseph Browne inserting metal filings in the scagliola matrix to create a more convincing lapis effect. Visually, this was highly successful and Browne also used metal filings in the bright crimson columns of the blue room, creating a somewhat ‘fantasy’ finish not reminiscent of any familiar marble or stone.
 |
||
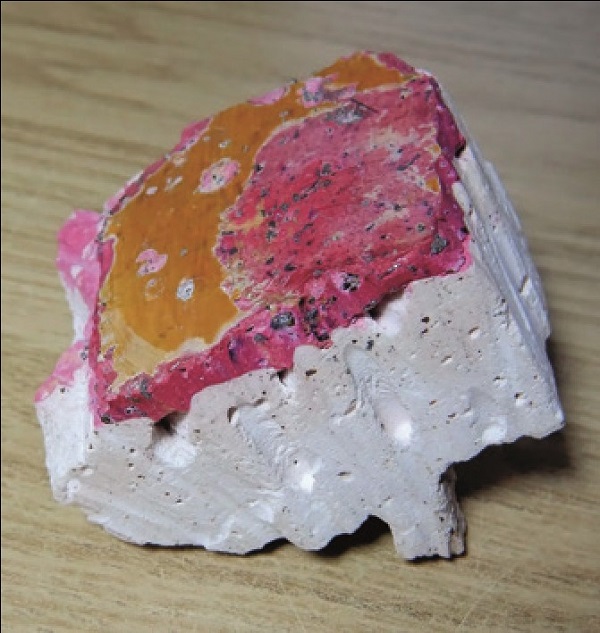
| The sample extracted from the blue room: the metal filings, current paint coating and the bright crimson colour are clearly evident. |
So, after an initial visit and visual assessment of the problem, samples were extracted from inconspicuous areas of both sets of pilasters. These were carefully analysed with a view to determining the causes of the problem and, most importantly, to assess whether a restoration programme was feasible.
This in-depth investigation concentrated on the lapis pilasters in the music room and a sample of approximately 10 x 10cm was taken for analysis, to provide information on the pigments, coatings, aggregates, additives and filings that Browne had used. Alongside chemical and physical analyses, samples were sent to Leeds University laboratory for analysis by scanning with an electron microscope using energy-dispersive X-ray (EDX) spectroscopy. The analyses revealed that the pigment used was an early Prussian blue, readily available at the time for the most prestigious work. However, the ratio of pigment to plaster was found to be about 1:5 by volume, which would have rendered the scagliola mix rather weak. This would have probably compounded problems caused by the metal filings, which were discovered to be shavings of tin, copper and brass, all non-ferrous, anything from a few microns to 4mm in length, averaging 2mm each.
Many other particles and impurities were detected, but these were all naturally occurring in the sort of plaster used at the time, and generally made the matrix more robust. The coating was, as expected, oxidised linseed oil.
So, the verdict was that the pitting was due to oxidisation of the tip of the metal particles that came into contact with the air, expanding, thus weakening the scagliola matrix around them. Although a small amount of corrosion had also formed around the metal particles this would have only taken place once, just after the installation of the pilasters, and was now stable within the body of plaster. The solution to this problem and in order to delay or even halt this ongoing process, was to create a barrier between the metal filings and the atmosphere. This barrier in the form of microcrystalline wax would prevent any moisture from further reacting with the metal filings and would also act as a soft polish, which would need re-applying from time to time. A restoration programme was then drawn up by the author and the company’s conservator Yvonne Adamson, based on the unique investigation and findings of the analyses and report, with the aim of restoring the columns to their original beauty.
 |
|
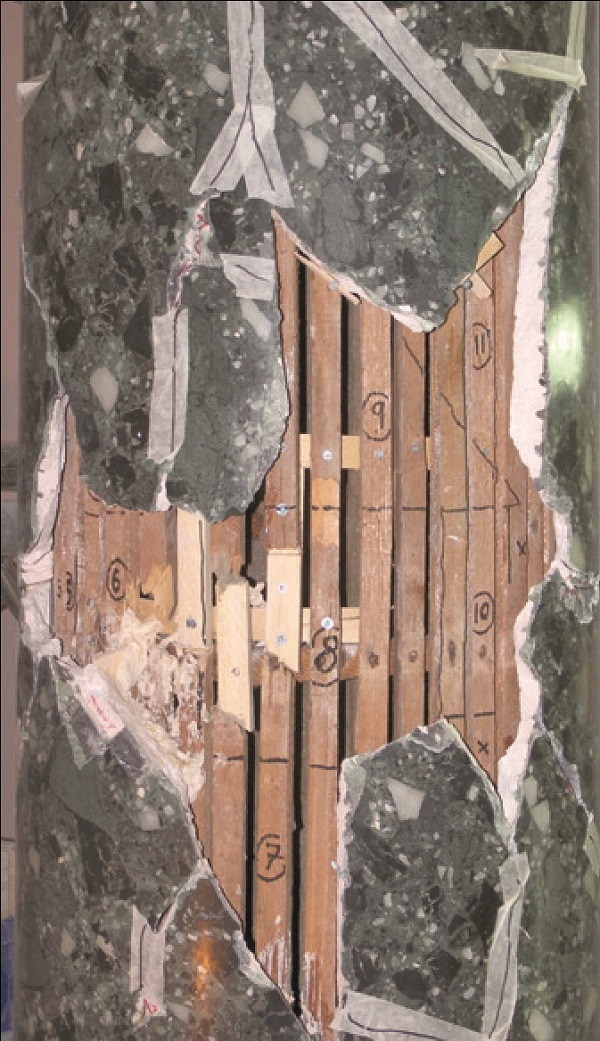
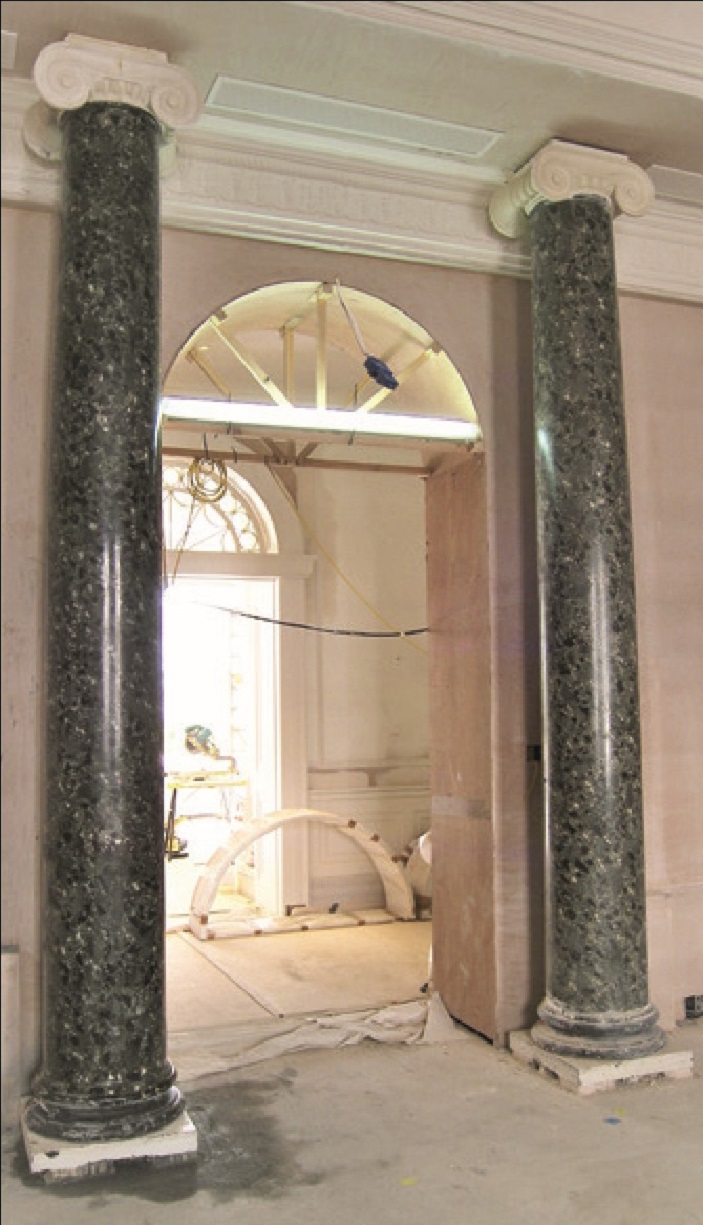
| The poor condition of the structure of the columns is evident. The laths had to be strengthened and any delamination injected. The numbering system has to do with the dry assembly of the broken pieces. | |
 |
|
| The pair of verde antique after restoration. |
The next step was to carry out a test panel, so a sample area on one of the scagliola pilasters was selected, which measured about 25cm wide and 35cm long. Very briefly, the surface of the existing scagliola was lightly cleaned, sanded and cleaned again. Microcrystalline wax was then applied and the area was carefully polished before awaiting the passage of time to assess. The polishing was a critical aspect of this process as over-polishing would dislodge some of the very soft metal particles thus creating long term problems with moisture penetration. We waited seven whole years as proceedings were delayed, but when we finally visited the music room again in 2008 to assess the sample area, we found that it had endured the test of time extremely well. Our conclusions enabled the subsequent restoration programme to go ahead.
CARLTON HOUSE TERRACE
A very different set of problems was posed when two full size verde antique columns fell flat on the floor while in storage, smashing to pieces. The first problem was how to make the lath structure of the column strong enough for the loose scagliola pieces to be assembled, while retaining the column’s true axis and original form. The second was selecting a bonding agent for fixing the loose sections to the lath. And finally, how to marry the many different areas, disguising any gaps, voids and sections where the scagliola had fractured beyond repair.
After erecting the columns back in their original place, plumbing them carefully to ensure a true axis and entasis, the capitals were reassembled ready for the verde antique restoration. The integrity of the wooden skeleton was ensured by strengthening broken laths by attaching new ones with wood glue, ensuring an excellent bond, and by injecting a slightly diluted PVA-based binder to areas of minute detachment between the lath structure and the plaster backing coat (which is part of the scagliola veneer). The PVA binder is reversible, and had been used before in other projects with excellent results compatible with modern conservation practices.
Next, all the broken pieces of scagliola had to be carefully collected and dry-assembled on the lath structure to determine where each one had come from. When this was completed, a plaster slip was used as the bonding agent between the original lath and the broken pieces. For this particular process an agreement with English Heritage was reached and a traditional binder was used – a certain type of plaster of Paris – rather than a modern binding substance, which would have been foreign to the original materials used; again all part of a good conservation strategy.
As is usual practice with all scagliola conservation, light cleaning took place as soon as all the pieces had been assembled and secured in place. This was a 1:1 ratio mix of water and isopropyl alcohol, applied with a hand-held sprayer and wiped off straight away with cotton cloths.
It was then back to the workshop to replicate the missing scagliola sections and ensure a perfect match where the column surface had smashed to minute, unusable pieces. Some pieces had been kept back for this purpose, as there is no such thing as a standard verde antique finish. All scagliolists have their own unique way of working, so making trial samples is always essential.
After reinstating the areas of total loss, followed by the usual cutting back, sanding and filling of the new verde antique mixes and making sure that the adjacent, original scagliola remained intact, the restoration was completed by polishing with linseed oil. The result was a pair of columns in their original place, and even the eye of a connoisseur would not detect any intervention.
SPENCER HOUSE
In the dining room of Spencer House, four circular columns and four square pilasters had been executed in the 1780s by one of the finest scagliolists in England at that time, Domenico Bartoli. These had since been painted over in a flat cream-coloured paint. The brief was simple: to restore the scagliola work to its original 18th-century opulence and splendour.
In accordance with good practice, a visual inspection took place in the preliminary stages, followed by a tactile investigation, tapping on the fabric to locate any delamination or serious defects in the structure of the columns. These two rather low-tech investigation methods can reveal a lot to the experienced scagliola restorer. Historical and photographic archives were then researched to determine the maker, the date of construction and any other important historical information, such as similar examples of the craftsperson’s work and their dates. This research was essential to provide a thorough understanding of the historic and architectural significance of the scheme and to ensure that any replication of missing elements would be based on knowledge, not conjecture. By being fully immersed in the work of the original artist, the scagliolist can ensure that the repairs are recreated in both the correct materials and the style of the original, allowing the new work to be considered as a continuation of the original artist’s own work. Understanding the artist is vital to the success of any restoration project.
 |
||
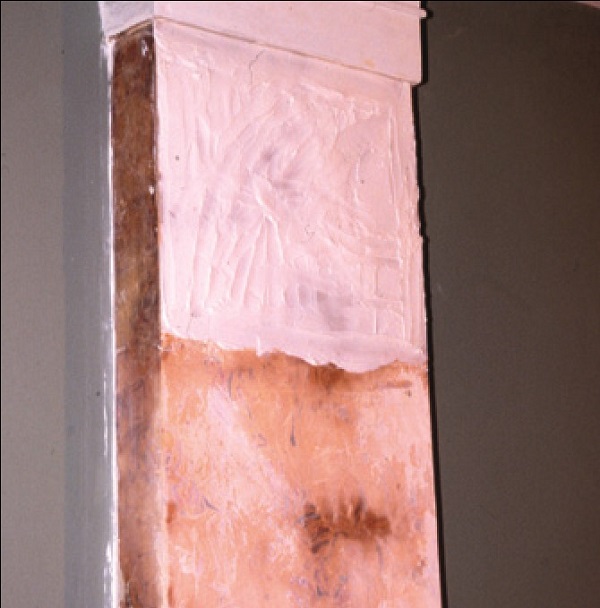
| The thick, white stripper applied on the scagliola and the discoloured, stained surface, after its removal. |
Photographic documentation of the condition at the start and as work progresses is also extremely important and should be regarded a key part of any comprehensive and complete conservation or restoration package. This will also form future archival information providing a sound source of reference for future interventions.
Paint samples were taken to analyse its constitution and the number of layers present. Based on this information, a plan for paint removal was prepared using the peelaway system, a thick yogurt-like substance which melts away many layers of paint simultaneously. This system can work well for large volume work, but extreme caution has to be exercised: if left on the columns too long, it would eat into original material and could destroy it completely. (Systems such as peel-away must never be used on more delicate work, like inlaid table tops for example.) Test trials were therefore used to help predict the required dwell times, and progress was monitored constantly. Once sufficiently softened, the paint system was peeled back, drawing the paint layers with it, and a chemical was applied to neutralise any residual alkalis.
This chemical was a diluted very mild form of acid, which must be applied to stop the residual and continuous effect of the alkaline poultice removal system. It is harmless to the scagliola matrix, but as a precaution all surfaces were then washed down well with fresh water and the residues sponged off.
Areas where the peel-away system had not sufficiently taken off the paint were worked further with a milder liquid paint stripper, which produced good results. The columns and pilasters were then assessed once more, this time in meticulous detail from mobile access towers.
 |
||
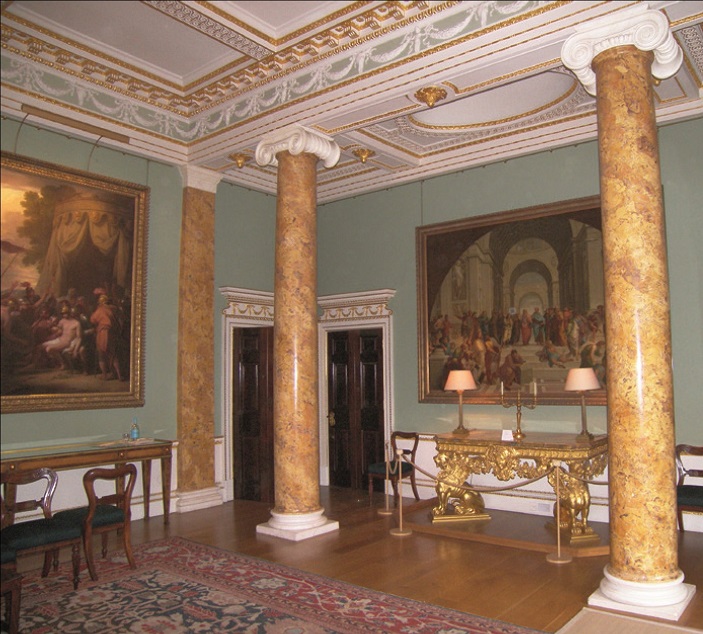
| The glory of Bartoli’s work setting off the elegant interior decorative scheme. |
Paint removal had revealed a magnificent and rather exceptional yellow jasper scagliola, albeit in need of much further restoration work. Domenico Bartoli had worked extensively in the St James’s area of London and in many other places in England, and he was well known not just for excellent craftsmanship but also for more unusual scagliola finishes. Here his rendition of a yellow jasper lived up to every expectation, but the scagliola had been disfigured by earlier repairs in ordinary non-traditional fillers.
Following evaluation, it was determined that there were three stages to the work: making good the areas which had been poorly repaired in the past, making the body of the work smooth again, and polishing it to restore its high gloss sheen.
Stage one Without their layers of cream over-paint, the patches of white filler were easily spotted, varying in shape and size from hairline cracks, to one square inch sections, to irregular patches of some 30 square inches in surface area, to corner elements and mouldings missing altogether.
These were carefully raked out and keyed to provide a good bonding surface. The top edges of the voids were zig-zagged to provide an irregular line, between the original scagliola and the new mixes (the eye will be deceived more if you marry the old with the new, in an irregular line.) A mixture of PVA and water was then applied to surfaces within the recesses to control suction, ready for the new scagliola mixes to be applied.
 |
||
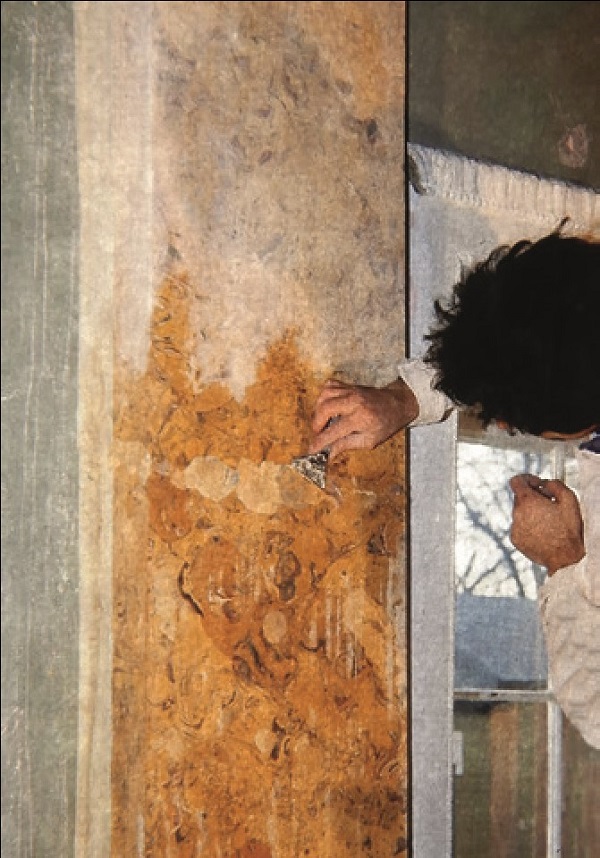
| The author working on one of the pilasters; compatible scagliola was applied thicker to fill in areas of loss, then cut back when ‘cheesy’. |
A small workshop area was assembled on site for preparing the many samples required, as about 24 different colours were recorded on the columns. Furthermore, the columns were complicated in their visual execution. Not only were they extremely rich, but they also had darker coloured banding ascending the columns in a visually pleasing manner. Faithfully replicating all these colours was interesting enough, but applying them in the correct combination to the appropriate area while maintaining the flow of the original was a welcome undertaking, requiring the utmost concentration, care and attention. The areas of void were filled in one at a time, thicker than the main body of work, and when they had acquired a ‘cheesy’ consistency they were carefully cut back to size with a sharp blade.
Stage two
The stripping process had revealed discoloured
and pitted areas, so after the voids had been
filled, the surface of all columns and pilasters
had to be made smooth again. First, a medium
wet-and-dry sandpaper was used with the
aid of water from hand-held sprayers. The
resulting glut had to be sponged off straight
away, to avoid damaging the work as it trickled
down the shafts. Where pitted, the surface
had to be filled several times with the correct
coloured plaster slip and then sanded, using
progressively finer grades of sandpaper until a
very smooth finish had been achieved ready to
take the polish.
Stage three
This is the most rewarding stage as, after all
the hard work and effort, the scagliola finally
comes alive in all its glory. Over a period
of around three days, a few layers of double
boiled linseed oil were applied with soft
cloths. Burnishing took place between stages
of application with a 1200 grade sandpaper
(no water this time) followed by polishing
with mechanical buffers, to reveal the rather
remarkable yellow jasper scagliola, a result that
exceeded all expectations.
It is hoped that the above examples have given a brief insight into a range of case studies of scagliola restoration and the craftsmanship involved in this unique historic process.