
Tiled Murals
A new pre-conservation removal technique
Shane Casey
 |
|
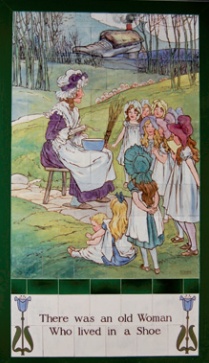
| One of the panels after removal |
Late in 2001, Eura Conservation was asked to look at the possibility of saving some signature panels from the shortly-to-be-demolished Manchester Free Trade Hall. The signatures were in pencil on rendered plaster and belonged to some of the musicians who had appeared in the hall since its post-war rebuild in the early 1950s. A successful removal technique was developed and the panels are now on display in the Radisson Edwardian Hotel, built on the site of the old Free Trade Hall. The main contractor asked whether the technique could be modified for use in another project for which they were tendering, involving the safe removal of ceramic tile panels from the Royal Victoria Infirmary in Newcastle. Eura’s response was a conditional yes, although some development work would be required.
THE NEED FOR INTERVENTION
Two children’s wards, containing 68 Doulton tiled panels, were due to be demolished as part of a redevelopment of the hospital. One of the great benefits of ceramics is that the colours often remain as fresh and vibrant as the day they were first created and this is certainly the case with this remarkable collection.
Most of the panels depict traditional nursery rhymes and were painted by artists such as William Rowe, JH McLennan and Margaret E Thompson. Similar panels can be found on the walls of the Sassoon Hospital in Poona, India, as well as the Wellington Hospital, in New Zealand, which has recently conserved 18 panels. The Newcastle collection is significant, however, in that it comprises no less than 57 story panels, together with nine panels depicting rural scenes and two text panels showing the names of the wards. There are a further 18 text panels in other parts of the hospital. It is thought to be the largest such collection in the world. The collection is of further importance in that it is a snapshot of the Edwardian age: illustrative of the role played by rhymes and stories in children’s education, of attitudes towards the infirm and of social philanthropy.
THE CHOICE OF CONSERVATION PROCESS
The traditional approach to the task of removing tiled panels is to cut along the line of grout, freeing each tile from the matrix of its fellow tiles. This ensures that any cracking will be contained and limited to an individual tile. The conservator then prises the tile from its matrix. There are a number of difficulties and risks associated with this process. The technique relies on a minimum gap width between each tile that is larger than the cutting width of the blade, so that the grout can be cut without damaging the tile glaze on either side of the kerf (the width of the saw cut). The chief risk, however, is that the conserver has to attempt by trial and error to prise a very hard, brittle object off a similarly hard underlying surface. The process often results in tiles being cracked. Because the process separates the panel into multiple pieces, there is also the risk that parts may be lost or the orientation of components confused.
 |
||
| The panel covered with fibreglass Paraloid, fibreglass matting and cushion pads |
A different process was developed for the removal of the signature panels from the Free Trade Hall. The process had to address the fact that as there were no joint lines to cut along the panels had to be removed in one piece. If a similar technique could be developed for the Doulton tiled panels it should result in reduced irrevocable treatment and increased efficiency. The objective of the new technique would therefore be the removal of an entire panel in one go, with a sufficient layer of cementitious backing retained in place to prevent flexing and separation of individual tiles along the lines of the grout. This was to be achieved using a combination of frontal facing and support, and diamond-wire cutting through the entire backing of the mortar matrix.
THE NEW PROCESS
To achieve the cutting action a continuous loop of diamond-coated wire is mounted on a number of pulleys, one or more of which are motorised. Between two of the pulleys there is a large span of wire that performs the cutting as it comes into contact with the target material. As the wire cuts, it is pulled through the structure like a cheese wire. Obviously, considerable care has to be taken to ensure that the wire does not come into contact with the tiles.
In Manchester, the signature panels were supported during removal by carefully pre-fitted mild steel frames. While this technique worked perfectly, the tiled panels in Newcastle were significantly larger. Consequently, a series of workshop trials were conducted on specially prepared mock tile panels. These tests were chiefly concerned with developing a means of adhering a rigid surface to the face of the tiles in such a way that the weight of the entire panel could be borne in tension by the adhesive/consolidant. The adhesive had to be fully reversible, and to cause no adverse reaction to the tiles. The final choice was a 20 per cent solution of acetone and Paraloid B72. It gave a pull-off test value in excess of 10 kN/m2 and was wholly reversible.
On the hospital site, each panel was surveyed and any site-specific requirements noted. The perimeter of each panel had been bordered in recent times with a 50mm wide pine frame, mitred at the corners, and screwed through into the wall. The frames were dismantled, revealing many old holes in the tiles and a general thin covering of plaster and paint. This was removed with a proprietary dichloromethane paint stripper.
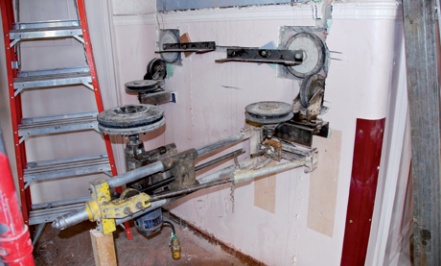 |
||
| The diamond wire cutter installed; note that the tile panel is now protected by a plywood sheet |
After the surface had been checked for painted plaster repairs (often found on old panels), the tiles were cleaned with acetone. A border was then marked around the outermost part of the panel with a chinagraph waxed pencil. This border provided a safe perimeter around the picture tiles. Any areas where grout was missing were then repaired to ensure a uniform matrix of tiles.
A barrier coat of 20 per cent Paraloid B72 and acetone was then applied. This was to serve as a removable barrier coat between the tiles and a layer of glass-fibre woven matting bonded with 20 per cent Paraloid B72 and acetone. Small urethane foam pads were placed at regular intervals on the surface of the rigid matting once the B72 and fibreglass matting had completely solidified.
A 25mm marine plywood sheet, which had been pre-cut to the exact dimensions of the tile panel, was then positioned to cover the tiled panel, with the bottom edge of the plywood resting on two lengths of all-thread, which had been resin-fixed into the wall. The plywood panel itself had also been pre-drilled with a regularly spaced series of 12mm diameter holes. Horizontal timber battens were then fastened to the wall in the same manner as the all-thread. These held the plywood sheeting firmly against the foam spacers. The plywood panel was then bonded to the consolidated and protected surface using aerosol polyurethane foam, injected through the holes in the plywood. The battens held the plywood panel firmly in place while the foam expanded and cured. Once the foam had cured, the battens were removed and a bespoke aluminium lifting-frame was screwed to the plywood panel.
The next stage was to accurately chase four 30mm wide slots around the entire panel, to a depth of 45-50mm. These slots determined the final size of the tile panel. Meanwhile, sufficient space had to be created in the ceiling above the panel to enable an aluminium ‘I’ beam to be placed into a pocket in the wall. The plywood panel over the tiles served to protect them during this procedure.
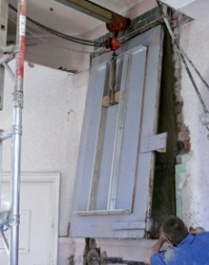 |
|
| The cut panel being lowered from the wall |
To allow the diamond wire cutter to operate, a number of square chases, roughly 150mm x 150mm, had to be cut into the wall to accommodate the pulley mechanisms. The machine was now carefully anchored in place with the diamond wire resting in the upper horizontal chase above the panel.
The initial cuts to seat the wire and ensure it wouldn’t jump out of the slot were accomplished by hand. The machine then cut downwards through the mortar, at a distance of 30mm from the front face of the tiled panel. Once the machine had cut through around 75 per cent of the panel, cutting was halted. A scaffold tower was erected and the aluminium beam was positioned above the panel, supported by the tower and the excavated wall pocket. The panel was fastened by a sling attached to a 500kg safe working load chain hoist on the beam and to the lifting frame on the panel. The sling was then pre-tensioned to accept the anticipated weight of the panel. Cutting then recommenced and continued until the panel was free from the wall. It could then be lowered into a packing case and placed in safe storage.
THE PANELS AFTER REMOVAL
The panels were transported to conservation workshops where each panel was unpacked and placed facedown on the bed of a masonry plane. The cementitious matrix on the back of the tiles, which still bore the marks of the cutting wire, was now abrasively planed to a completely level surface. This surface allowed the panel to be refastened to another 25mm sheet of plywood which would act as the final display substrate without creating any undue pressure points on the original tiles. The panel was then turned over so that the lifting system could be removed. This involved unscrewing the lifting frame, sawing through the polyurethane foam with a soft saw, peeling off the Paraloid reinforced glass fibre and removing the remains of the Paraloid. The panel was then mounted in a stainless steel frame containing an internal green frame, designed to reflect the original framing tiles.
Other than making aesthetic repairs to some 1970s screw holes, no other conservation treatment was necessary.
FUTURE APPLICATIONS OF THE PROCESS
The removal technique was developed to suit a particular set of circumstances. It combined efficiency of labour, relatively low cost, and speed, while minimising irrevocable treatment of the objects. All consumable materials were easily sourced, inexpensive, and presented no threats to the object. Nor were there any difficult ethical conservation decisions to be made over the need to cut brickwork and drill chases in the surrounding wall because the building was destined for demolition. The diamond cutting process was lubricated with water and the cutting of chases generated some dust. Both of these potential pollutants were satisfactorily controlled in this situation, although controlling them might be less easy in other contexts.
Since the success of the technique relies in part on the strength of the bond between the glazes and the body of the tile, the significance of the surrounding building and the exact nature of the tiles would have to be considered before this technique could safely be used on other similar projects. Nevertheless, resolving these issues should be relatively straightforward.