
Tudor Brickwork
Gerard Lynch
 |
||
| The six-storey Tudor folly Freston Tower (c1550), which overlooks the estuary of the River Orwell in Suffolk (Photo: The Landmark Trust) |
The Tudor period (1485-1603), which is often considered in the two broad phases ‘Early Tudor’ and ‘Elizabethan’, witnessed the decline of the Gothic style, symbolised in brickwork by the low-rise, ‘four-centred’ or ‘depressed’ arch. The Gothic was gradually displaced by Renaissance elements with a marked Classical influence.
A newly rich gentry, courtesy of land and assets taken from the Church after the Dissolution of the Monasteries (1536), instigated a frenetic period of secular building, creating fine mansions in brick. Brickwork was reserved for the privileged and received the royal seal of approval when Henry VIII took ownership of Hampton Court Palace (1514) from a disgraced Cardinal Wolsey in 1528.
BRICKMAKING
Although commercial brickyards with permanent up-draught kilns existed, most bricks were made by itinerant brickmakers. They were hired by wealthy clients to locate suitable ‘topmost’ clay, frequently found on the site of the proposed building, and to excavate, mould, dry, fire and deliver bricks. Ideally, clay was excavated in the autumn and over-wintered to break it down and help remove soluble salts, ready for moulding from springtime onwards.
Preparing the clay for moulding resulted in clay with a high water content. This made it difficult to fully fill the mould, which is why Tudor bricks are shallow in gauge (height) with rounded arisses (the right-angled edges). Sizes are typically found to range from 210-250mm x 100-120mm x 40-50mm.
The mould was a simple frame, open top and bottom. The clay was thrown in, the excess struck off with a timber ‘strike’ and the frame lifted and removed. The best bricks would have been made at a bench, resulting in an even gauge. However, Tudor mansions demanded huge numbers of bricks, and judging by the irregular variation in dimensions between what should be parallel faces, it seems that some moulds may have been placed directly on the ground.
Although unevenness of the ground might explain an undulating bedding face, the difference in gauge of some Tudor bricks is most likely to be because the mould moved or tipped when the excess clay was struck off. (Essentially the same moulding process can still be seen in use today in developing countries such as Iran, Iraq, India and Pakistan, and in much of Africa.) Once moulded, the bricks were first laid out flat, on bed, to dry until strong enough to be placed on edge, being turned daily until fully dried and ready for firing.
Rather than using limited capacity kilns, bricks were usually fired in huge temporary open clamps that were capable of firing in excess of 100,000 bricks. Both clamps and kilns were designed with ‘fire-tunnels’ on the longest, opposing sides into which the fuel, mainly timber, was fed. Low-fired by modern standards, brick colours were dependent on clay mineralogy, ranging from pale pinks through to dark reds and buffs. The faces of the bricks that lined the fire-tunnels were exposed to the highest temperatures and the effects of hot flue gasses. These bricks were darkened or ‘flared’ in the process and were commonly used as headers for decorative effect (that is, they were laid at right-angles to the wall face). All fired bricks were graded for use within a structure with the best quality reserved for face work. Under-fired ‘semels’ (meaning ‘semi-fired’) were usually re-fired, although builders might, wrongly, use some, especially for internal walling, despite being forbidden to do so under the terms of their engagement.
BRICKWORK
Tudor brickwork exudes confidence, being used for both utility and show. Bonding was mainly based on variations of English bond, with English cross-bond being particularly popular as it allowed the bricklayers to create regular quarter-bond offsets in every course that facilitated patterns, or diapers, utilising the flared headers to create a polychromatic effect.
Specially shaped bricks could be made by one of three methods. They could be cast using a suitably shaped mould or, less commonly, when three-parts dry, the ‘green’ clay could be cut to shape with a knife. However, with these two methods the resultant profile could distort during drying and firing. The most common method, therefore, was to ‘cut and rub’ the fired bricks to produce a wide variety of ornate shapes using a brick axe, a saw, a hammer and chisel, and various abrasives. Called ‘hewing’, this practice was introduced by Flemish craftsmen during the 15th century and required great skill. The results can be seen in cut-mouldings for plinths, reveals, tracery, label mouldings over openings and in the highly decorative chimney stacks which define the brickwork of the period.
 |
||
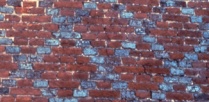
| An example of Tudor polychromatic brickwork built of orange-red bricks laid in English Cross-bond to display ‘diapers’ of flared headers, at Farnham Castle, Surrey, d 1508 (Photo: Gerard Lynch) |
Tudor brickwork is characterised by thick joints of lime-rich mortar that served as a flexible gasket. This was necessary for laying the typically irregular bricks to the line, level and overall gauge required to fit the dimensions of the architectural elements of a facade. The faces of the joints were finished, or ‘jointed’, using the trowel as work progressed to create either a flush face, or more usually a ‘struck’, or a ‘double-struck’ profile (see illustrations below).
To overcome the unavoidable variations in brick tones characteristic of up-draught firing, and to highlight the diapering, the predominantly red brick, premier, facades were usually colour-washed (not limewashed). Washes were based on preparations primarily consisting of red ochre as the pigment, glue size and ‘small ale’ (a readily available form of weak beer) to help it adhere to the masonry, and alum to ‘fix’ the colour. The wash was brush-applied over both bricks and joints once construction was completed. This finish also provided a small degree of protection to new brickwork laid in slow-setting lime-mortar.
Once the colour-wash had dried, the joints were selectively highlighted, but to a lesser scale, with regular narrow lines of white, or occasionally pigmented, distemper (a mix of glue size and crushed chalk, or ‘whiting’) using a thin paintbrush in a process termed ‘pencilling’. These techniques added refinement to brickwork facades but some modern observers, used to a more weathered and rustic appearance, find the results garish.
DECAY, CONSERVATION AND REPAIR
Before deciding on the most appropriate method of conserving or repairing historic brickwork, it is very important that a full assessment and accurate diagnosis of all failures is undertaken to correctly determine the causes.
Decay is often found to affect individual bricks and mortar joints in specific areas to varying degrees. Failures may be related to structural problems but they are often simply the result of the normal effects of exposure to the aggressive, cyclical weather-action of rain and frost. Water, in its different forms, is the main agent of decay and the original construction and detailing of the brickwork will largely determine its ability to minimise the impact of driving rain and reduce the potential of damaging saturation.
The measures taken to prevent damage associated with water – the maintenance of all rainwater goods, flashings, gullies, sills, copings and cappings, and ensuring good drainage – are at the heart of good brickwork conservation.
INSPECTION AND SURVEY
Perhaps the most common indications of defective brickwork are:
- spalling (erosion or delamination of brick faces)
- surface staining from air-borne pollutants and organic growth
- excessive algae or uncontrolled plant growth
- eroded, soft, crumbling or loosened mortar
- crystallisation of soluble salts on or within bricks
- loosened or dislodged bricks
- bulges, misalignment or cracks in the brickwork
- poor bonding or inadequately tied-in corbelling
- failure of arches and lintels due to inadequate abutments or bearings
- leaning chimney stacks.
To determine the cause of the failure and specify the best method of conservative repair, it is essential to record accurate information on the defective materials or constructional elements. It is necessary to understand the building’s history and original construction methods and materials used to develop a sympathetic repair strategy.
 |
 |
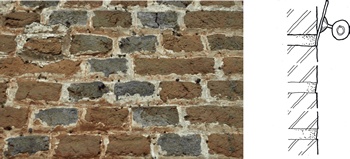
| Tudor brickwork at Chenies Manor, Buckinghamshire, dated 1520,
jointed with a ‘struck’ profile, and displaying traces of the original
red ochre colour wash and narrow, white ‘pencilling’. (Photos and diagrams: Gerard Lynch) |
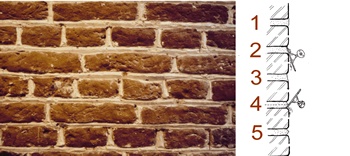
An original example of Tudor ‘Double-Struck’ jointing from a wall in the great kitchens at Hampton Court Palace, c 1540. It was uncovered in the early 1980s below plaster applied soon after the wall was completed, when design alterations ordered by King Henry VIII, made the wall internal. The diagram shows the stages of execution: 1) bed joint from trowel, 2) joint ‘struck in a weathered fashion by trowel, 3) 1st stage completed, 4) joint struck by trowel, bottom up to middle line, 5) the finished profile. |
CONSERVATIVE REPAIR
Everyone involved in the repair of historic brickwork should be aware of and strive to adhere to the philosophy of repair set out in the Society for the Protection Ancient Building’s Principles and Philosophy and within relevant national guidance, such as English Heritage’s Principles of Repair. These documents provide clear guidelines promoting respect for the historical integrity of a building by emphasising a minimum intervention approach.
It is beyond the scope of this article to deal with each and every problem or failure associated with Tudor brickwork. It is important, however, to briefly examine the main issues surrounding replacement bricks and mortars.
REPLACEMENT BRICKS
When the faces of Tudor bricks have spalled sufficiently to warrant intervention to arrest decay, there are two main options:
- carefully cut out the full brick, clean it and the resultant indent of debris and reverse the brick so that the decayed face is placed to the rear
- where the decay is too severe, carefully cut out and remove the brick for replacement with another Tudor brick or an appropriate modern alternative.
All replacement bricks, whether reclaimed or modern, must match the original in size, shape, colour, texture, porosity and, as far as can be determined, durability.
RECLAIMED BRICKS
Authentic 16th-century bricks are understandably rare. In the unlikely event that a suitable supply is available for re-use, it is vital to establish their provenance both to ensure that they originate from a traceable source rather than from the unauthorised destruction of another historic building, and that they were originally used externally. It is sometimes possible to source replacement bricks from elsewhere within the structure or contemporary structures within the curtilage. However, an expert assessment should be sought on the various implications of this (including structural, ethical and legal issues) ahead of official authorisation.
Most reclamation companies do not accept liability for faults and, unlike new bricks, reclaims do not have to meet test regulations to determine their performance. It is important, therefore, that all the reclaimed bricks are carefully inspected to ensure they are ‘fit for purpose’. A pallet of reclaimed bricks may contain various grades, including bricks that were only ever intended for internal walling and which would quickly deteriorate if exposed to the weather. Here, the experience and judgement of a good craftsman is vital.
MODERN REPLACEMENT BRICKS
 |
|
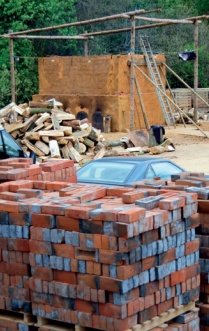
| A traditional open clamp at the brickworks of HG Matthews: bricks from an earlier firing, with their characteristic flared headers, are stacked in the foreground |
If the decision is taken to use modern bricks to match Tudor originals, it is important to locate a traditional brickyard excavating similar topmost clays and a commitment, as far as is practical, to manufacturing the bricks required as closely as possible to the original methods. Unfortunately, replacement bricks are sometimes moulded too accurately so that their uniform texture and sharp arrises lack the all-important irregularities of the surrounding originals. The bricks produced by more efficient modern kilns and fuel types can also be too regular in colour, lacking the subtle tones and shades associated with updraught kilns.
To produce the most authentic period bricks, it is necessary to mould with less precision and to recreate the historic method of firing by using the kind of kiln or open clamp that any Tudor brickmaker would recognise. Modern fuels achieve much higher temperatures than were possible in the 16th century so it is preferable to go back to timber as the fuel. This has been undertaken at the Buckinghamshire brickyard of HG Matthews (right) where the bricks lining the fire-tunnels naturally acquire the glossy grey ‘potash’ glaze that is commonly found on many of the bricks in a Tudor building. The effect, which is not achievable using coal as the fuel, is caused by the formation of chemicals as the timber burns. These probably act as a flux on the surface of the hottest bricks, allowing superficial vitrification, the fusing of mineral crystals to form a glaze, and binding some of the ash in the process.
Similar effects can be achieved by employing methods once traditionally used for the production of imitation flared ‘headers’ in brick tiles. These tiles, which are also called mathematical tiles, were sometimes used in the 18 and 19th centuries to face earlier buildings to mimic the fashionable appearance of contemporary brickwork. The ‘header’ tiles were coated with fluxes such as alkaline potash and then re-fired. Although less authentic than the effect of true wood firing, the technique has been successfully used to produce bricks for conservation work.
MORTARS
A wide range of building limes is now available for mortars for use in the repair or re-pointing of Tudor brickwork. Lime is the product of firing some form of calcium carbonate (CaCO₃) at around 9000C to drive off the carbon dioxide (CO₂) to become calcium oxide (CaO) or ‘quicklime’ which, with added water, is then hydrated to form either a powder (dry-hydrate) or, with an excess of water, to form putty. The material is now lime and it can be used as a binder with a filler (usually sand) to make mortar, plaster or render.
There are two basic types of building lime, both of which are covered by BS EN 459-1:
Air lime (sold as lime putty) is made from a limestone containing approximately 95 per cent pure calcium carbonate. This class of lime only hardens by carbonation, through re-absorbing carbon dioxide from the atmosphere to return to calcium carbonate (but now in the form of mortar not stone) in a process known as the ‘the lime cycle’. Air lime is incapable of hardening below water where it is removed from the effects of the atmosphere. Other craft names for it are ‘high-calcium’, ‘fat’ or ‘rich’ lime, and it is often referred to as ‘non-hydraulic’ lime or simply by the abbreviation CL – ‘calcium lime’.
Natural hydraulic lime (NHL) is made from sources of calcium carbonate naturally containing varying amounts of silica and some alumina that, in firing, become reactive with calcite (crystalline calcium carbonate). The initial set that occurs arises from the combination of these compounds with water to form a new crystalline matrix. In addition, the lime follows the lime cycle, hardening as it carbonates. It is the first set which enables these mortars to set deep within a structure where there is little available carbon dioxide, and even under water (hence ‘hydraulic’). The higher the silicate content the quicker and stronger the set. The natural hydraulic limes currently utilised in conservation today are divided into three classes of ascending strength: NHL2, NHL3.5 and NHL5 (the numerals relate to the compressive strength in N/mm² at 28 days). These are available as bagged dry-hydrates. The term ‘natural’ is significant as there are now two other designated classes of lime: hydraulic limes (HLs) which are permitted under BS EN 549-1 to contain up to 10 per cent undeclared content, including cement; and ‘formulated lime’ (FLs) which are blends of calcium hydroxide and a range of performance enhancing materials such as cements and pozzolana. Neither should be used in the repair of historic fabric.
Generally, repair mortars should match the existing as closely as possible in mineral composition, texture and strength, except where attributes are linked to its failure. A preliminary analysis can be carried out as an on-site visual appraisal using knowledge of the local geology of historic building limes and sands to determine a suitable replacement. A better method is to send mortar samples for analysis by a reputable laboratory. The results can provide a vital tool in accurately determining data to aid specification, such as:
- class of binder
- aggregate type, size and grading
- ratio of binder to aggregate
- other inclusions.
Only complete sections of bed mortar (typically 100 x 150mm) should be sent for analysis. These are first studied under a microscope before removing the lime binder using ‘acid digestion’. The residue (principally mineral aggregates) is then washed, dried and graded within a stack of British Standard test sieves to determine the range of aggregates. The information revealed by these simple steps is usually sufficient for the specification of a replacement lime and sand mortar suitable for its intended purpose and compatible with the surrounding original. More sophisticated analyses such as electron-scanning microscopy and x-ray diffusion can also be successfully employed.
Although lime to sand ratios are often described as 1:3, analysis reveals that most historic mortars were far more lime-rich, with most ratios averaging between 1:1 and 1:2 (see the author’s article, ‘The Myth in the Mix: The 1:3 ratio of lime to sand’, in The Building Conservation Directory, 2007).
RE-POINTING
Where Tudor brickwork is concerned, re-pointing should never be undertaken lightly. Re-pointing should only be considered if the depth of erosion is greater than the width of the joint, or if the joints are allowing sufficient water ingress to cause interior damp. As the thick joints on Tudor brickwork can constitute 25 per cent of the wall surface area, inappropriate and/or poorly applied re-pointing can seriously impact the aesthetics of the brickwork, over-emphasise the joints, and detract from the overall charm of the Tudor building.
If re-pointing is deemed necessary, joints must be carefully cut back to a squared seating at least 2.5 times the width of the average bed joint thickness (38mm for a typical 15mm joint width). Joints are then brushed or vacuumed clean of debris and well dampened but not saturated. The choice of lime and sand for the mortar and mix ratio must be specified on a ‘suitability of purpose’ criterion. The joint profile is important too. It might be an exposed aggregate, finished just back from the face of the brick to match the appearance of the surrounding mortar. On a complete re-point of an elevation, however, an opportunity exists to consider sympathetically recreating the established original ‘struck’ or double-struck’ profile.
Re-pointing must not be carried out if there is a risk of frost and, once completed, the re-pointed joints must be suitably protected until they have sufficiently cured to ensure that they are not damaged by the elements; and particularly the effects of driving rain.
All historic brickwork is important and deserves sympathetic treatment and careful repair by knowledgeable and skilled specialists. Tudor brickwork, however, is particularly rare and deserves the highest level of care, both for its character and its historical significance. Fortunately, brick is a highly durable material and if properly pointed and suitably repaired Tudor examples should last for many more centuries.