
Wall Paintings and Environment
Lucy Kaszewski
 |
|
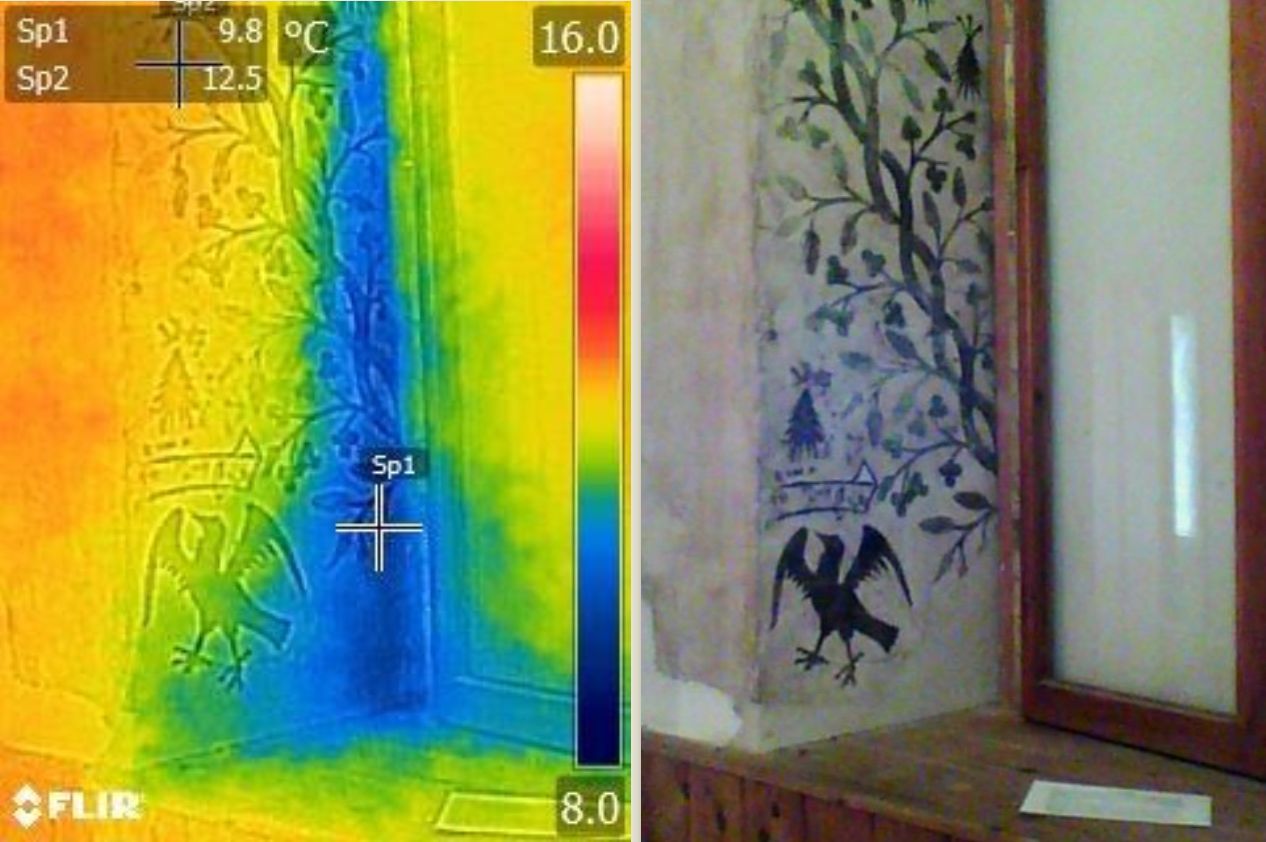
| Thermal imaging is a quick and effective survey method, which may highlight the main areas of concern within the paintings, Beveley Friary, East Yorkshire (All images: Hirst Conservation) |
Wall painting techniques evolved from cave paintings created with dry earth pigments and they can include a wide range of traditional and modern materials. The paintings may be executed on a variety of substrates, traditionally plaster, stone or timber, but also canvas permanently attached to a structural support. They can be composed of figurative or purely decorative features, free-hand painted or stencilled and frequently incorporate other materials such as metal leaf.
Because they form a very thin layer at the interface between the wall and the environment, wall paintings are integral to the larger host structures and are affected by changes in the latter’s stability and environmental conditions. As a result, they are highly vulnerable to deterioration and conservation can be challenging: any attempts to treat the paintings in isolation from their environment would be doomed to failure. While a generic remedial treatment strategy applicable to all wall paintings would clearly be impossible, this article aims to outline a general conservation approach based on the specific nature of wall paintings.
CONSERVATION APPROACH
Approaches to conservation have evolved over several decades. The early, mainly aesthetically oriented restoration methods were based on insufficient research and evidence, frequently proving more harmful than beneficial. Current best practice prioritises minimal intervention because the exact outcome of change is never fully predictable. Emphasis is placed on initial investigation, beginning with the key question of whether any treatment is really necessary. This can only be answered after a condition assessment has established whether the issues are ongoing and whether imminent losses would occur without intervention.
Diagnosis of the causes of deterioration should start with a survey of the object, preferably in graphic, photographic and written format, gathering all available and relevant information on the history of the building, alterations and additions. This initial assessment should aim to identify the probable reasons for damage and/or deterioration, and a programme of further investigation and monitoring may be required to confirm and understand the cause. The breadth and depth of investigations should always be tailored to the specific purpose, as should the presentation of the findings.
Following the initial investigations a decision needs to be made on the way forward. Addressing the causes and activation mechanisms brings more effective results than attempts to strengthen the object by remedial work. Priority is therefore given to preventive conservation measures such as essential maintenance work, followed by passive treatments such as environmental control. This requires very accurate identification of the reasons for failure, targeted, frequently multidisciplinary methodology and further monitoring of the impact of the measures on the painting. Carefully planned and used where appropriate, preventive and passive measures can minimise the need for interventive and often costly conservation in the future.
If passive or preventive measures alone are insufficient or not feasible, remedial treatment must be considered in order to strengthen the wall painting and avoid further decay.
Much compromise is frequently required between various approaches, but the common aim should be to postpone and minimise the need for invasive treatment.
SURVEY AND MONITORING
 |
 |
||
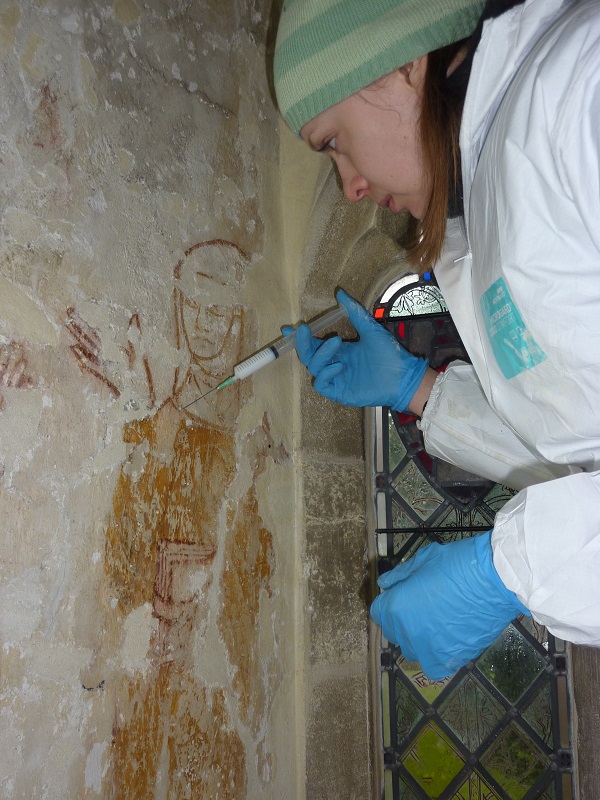
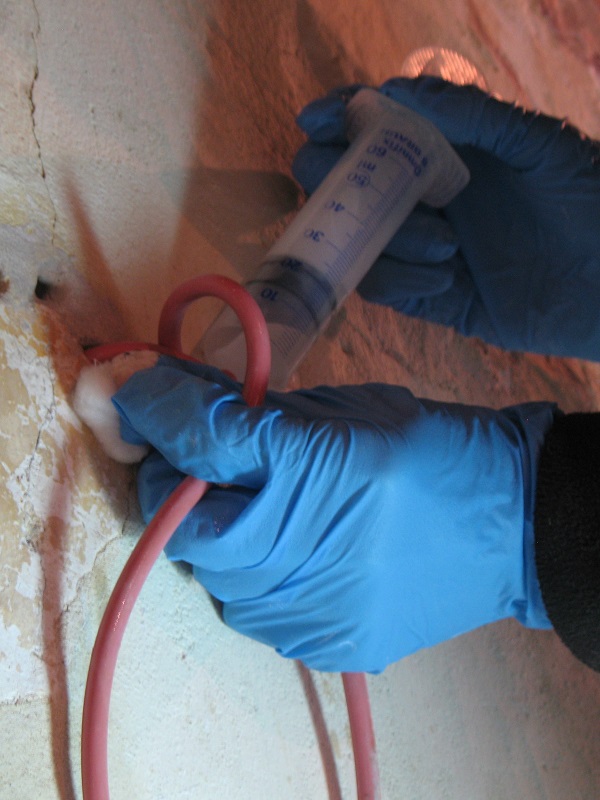
| Left: Consolidation of medieval wall paintings utilising injections of nanolime. All Saint's Chruch, Little Kimble, Buckinghamshire. Right: Injection of lime-based grout was undertaken to stabilise the historic plaster, All Saints Church. | |||
Often observation alone can quickly indicate the possible causes of deterioration. The location, form and nature of any degradation seen on the wall painting’s surface will generally suggest the agents/substances and processes responsible.
Even before entering the building much information may be gleaned:
- Does the building exterior look well maintained and water-tight?
- Are there visible cracks, open joints, moss growth, blocked or broken drains and gutters?
- Are there signs of persistent damp in the walls such as salt efflorescence, ‘tidemarks’, or flaking paint, stone, brick or render within the reaches of rising damp, or due to leaking gutters and drains?
- Is there potential for the pooling of rainwater (ground sloping towards the building, proximity of a watercourse, impervious paving adjacent to walls, etc)?
Once inside the building:
- Is there a smell of damp?
- Does the floor show signs of damp?
- Do the bases of the walls exhibit tell-tale signs of rising damp (frequent re-plastering, possibly using impervious cement, etc)?
- Is the floor level lower than the ground level?
- Are there signs of surface condensation or water ingress (typically dribble or run marks)?
- Is the wall painting adjacent to any of the above-mentioned defects?
- Is the wall painting located on an external or internal wall, near a source of heating or ventilation etc, or exposed to sunlight?
Answers to these questions may be verified and quantified using instruments as outlined below. If there are no observable building defects or problems, instrumental investigations are perhaps even more important.
In addition, there may be a need for sampling of salt efflorescence, paint, mortar, plaster and substrates generally for analysis, so that the materials are fully understood and any contaminants or peculiarities identified. The results may indicate the most suitable methods and techniques for testing, monitoring, cleaning and conserving/repairing. Mortar and paint analysis may also include calculations of their water vapour permeability and porosity, to give a clearer picture of their performance and suitability in the environmental conditions found in the building.
 |
|
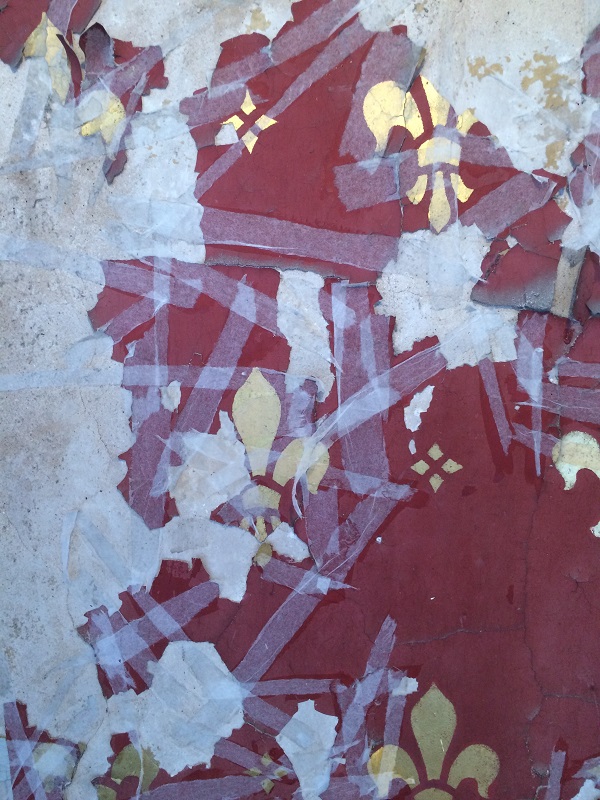
| Temporary securing of large paint flakes during consolidation may be introduced to avoid further loss, Gorton Monastery, Manchester |
Moisture measurement
Hand-held ‘moisture meters’ (such as those made by Protimeter) measure either electrical resistance or capacitance to correlate relative moisture content. Capacitance meters measure the impedance of a surface (to a depth of up to 4cm) to an alternating current, and resistivity meters measure electrical resistance to a direct current. As impedance and resistance decreases with moisture content, and resistance decreases with higher salt concentrations, these readings can provide useful information on both moisture and salt movement. However, they are also affected by the type of material and careful interpretation is required.
Carbide meters provide accurate measurement of moisture, but require core samples to be taken from the wall at different depths. Each sample is mixed with calcium carbide in a sealed container and the percentage of moisture is calculated from the pressure of acetylene gas produced (more moisture = more gas). Core samples from different depths and locations provide the most accurate picture of moisture movement, but it is time-consuming. The number of samples required can be reduced substantially by using this method to calibrate hand-held moisture meters for a specific material or material type.
Thermal imaging cameras are quick to use and cover large areas from a remote distance, including areas which may otherwise be inaccessible. They record variations in infra-red radiation from the surface and substrate which generally correspond with variations in material and temperature. When correctly calibrated, images range from blue (coldest) to red (warmest), and generally damp areas are colder (blue) than dry areas (red) during the day, with the reverse mostly true at night. The information can be very useful provided the effect of the material type and time of day are understood. Further verification by other analytical methods may also be necessary.
Salt measurement
Soluble salt and pH test strips or ‘salt meters’ may be used to provide a semiquantitative measure (mg/L or ppm) of the concentrations of anions (sulphates, chlorides, nitrates and others) from any soluble salts present on the surface. Salt meters use the increased electrical conductivity of salt solutions as a guide to salt concentrations.
If moisture and salt readings are taken systematically across (and within) the walls in grid fashion, then moisture and soluble salt profiles/gradients can be plotted. This information helps to identify salt sources (historic and/or ongoing), intensity and relationship, enabling conservators to distinguish between rising damp and related capillary diffusion, between direct rain ingress and infiltration, and between condensation at the surface and within the pores. It may also help to identify hygroscopic salt activity.
The proportion of soluble salts in the sample is often too small to be weighed, while still being significant in terms of its deleterious effect. By weighing and crushing the sample, dissolving the salts in the known volume of deionised water and then filtering, the percentage of sulphates, nitrates and chlorides can be semi-quantitatively determined using salt anion test strips. Strips are also available for some metal cations.
Where detailed information is required on the salt types and mixes, their concentrations (cations and anions) and their degree of hydration, surface and core samples can be submitted for ion chromatography, SEM, or XRD analysis. This enables calculations to be made of the relative humidity (RH) and temperature at which the salts become active.
Light readings
Lux meters may be used to measure light levels and to assess the exposure of the wall paintings to ultra-violet light in particular. As UV can have adverse effects on certain paints/pigments, measurements may indicate the need for UV protection methods.
Environmental recording and monitoring
Readings of RH and temperature outside the building and at different locations inside it may help put the moisture and salt readings in context for the day of the site visit. They can be correlated with the moisture meter readings, allowing a comprehensive understanding of the moisture dynamics. Furthermore, this allows the absolute humidity (AH or moisture density, g/m2 of the air inside and outside the building to be calculated, given the RH and temperature (or inferred from dew point readings), the differences and variation of which relate to the water-tightness and buffering effect of the building envelope. If the AH remains greater inside than outside persistently (regardless of RH changes), this would indicate excessive residual moisture in the fabric.
Continuous readings of environmental conditions may be recorded with data loggers placed inside and outside the building. These allow the changes in temperature, RH and AH/dew point inside the building to be correlated with changes outside during all four seasons. This gives more weight to inferences about residual moisture sources, and highlights the potential for condensation events and rain ingress.
INTERVENTION OPTIONS
 |
| Removal of discoloured varnish may significantly improve the legibility of paintings, Stanford Hall, Exeter |
It is only once all the data has been collated and correlated that the following decisions can be made:
- What type of conservation treatment is required, active and/or passive, to eliminate or reduce further deterioration of the wall painting?
- What are the most suitable methods and materials for conservation/remedial treatment which will stabilise the wall painting and its environment, ensuring its longevity?
- Will further moisture, soluble salt and environmental monitoring be required, not least to assess the success or otherwise of any conservation interventions?
- What ongoing maintenance may be required to keep the wall painting secure in its environment?
Preventive and passive interventions
Periodical monitoring and appropriate maintenance of the entire structure according to the ‘little and often’ rule are simple but extremely effective ways of preserving the paintings in good condition. In particular, the importance of maintaining water disposal systems cannot be overstated. Remote monitoring of inaccessible water disposal services such as valley gutters or high level hoppers are increasingly available and affordable. Managing exposure to direct sunlight may be partially addressed by the installation of UV filters, but careful investigations are frequently required to understand the actual impact of light on the painted surface.
Passive conservation often involves the introduction of environmental control systems. Such solutions are designed to minimise deterioration resulting from the impact of the unstable microclimate and water in vapour form, which is the main activation mechanism for soluble salts and microorganisms.Further passive interventions may include the removal of impervious paints and renders, the removal of thick vegetation and the improvement of drainage systems.
All such interventions require careful monitoring to determine their impact on wall paintings. Installation of control monitoring may be necessary in order to re-evaluate the results and identify potential errors.
Remedial treatment
The approach to remedial treatment should follow the ‘less is more’ principle, prioritising conservation procedures aimed at improving the stability and strength of the original painting. From the conservator’s point of view, restoration is rarely considered to be a necessary stage of the project, but it is often desired by the client.
There is no standard recipe for remedial treatment of wall paintings, but there are some general rules which need to be observed:
- the materials and methods should not introduce change to the character and appearance of the original painting
- the materials have to be stable and compatible with the original, and they must not have a detrimental effect on the historic fabric or impede future conservation treatments
- the painting should never be treated in isolation from its substrate and the overall structure, and causes of detrimental change must always be addressed first
- wherever possible, treatments should be reversible.
Methods of remedial treatment vary depending on the requirements but may include:
- emergency works aimed at preserving cohesion and protecting the wall painting before or during other interventions
- stabilisation of the substrate
- filling and repairs
- consolidation of paint layers
- surface cleaning and removal of other surface accretions, including overpaints and conservation materials
- retouching (‘colour re-integration’).
Emergency works typically involve facing the surface with tissue of varying properties and grades, depending on the purpose of the facing. These are applied using adhesives which are reversible in solvents that will not damage the painted decoration. Emergency preconsolidation may be undertaken when flaking and powdering of paint layers occurs to an extent where other treatments could result in damage. This is frequently a preferred option where direct application of a facing tissue would be likely to result in random relocation of severely distorted and detached paint flakes.
The transfer of wall paintings onto replacement supports was sometimes undertaken in the 20th century but this is no longer a recommended practice. It may be used in critical situations such as where the underlying structure cannot be saved and it is the only way to rescue the decoration.
 |
|
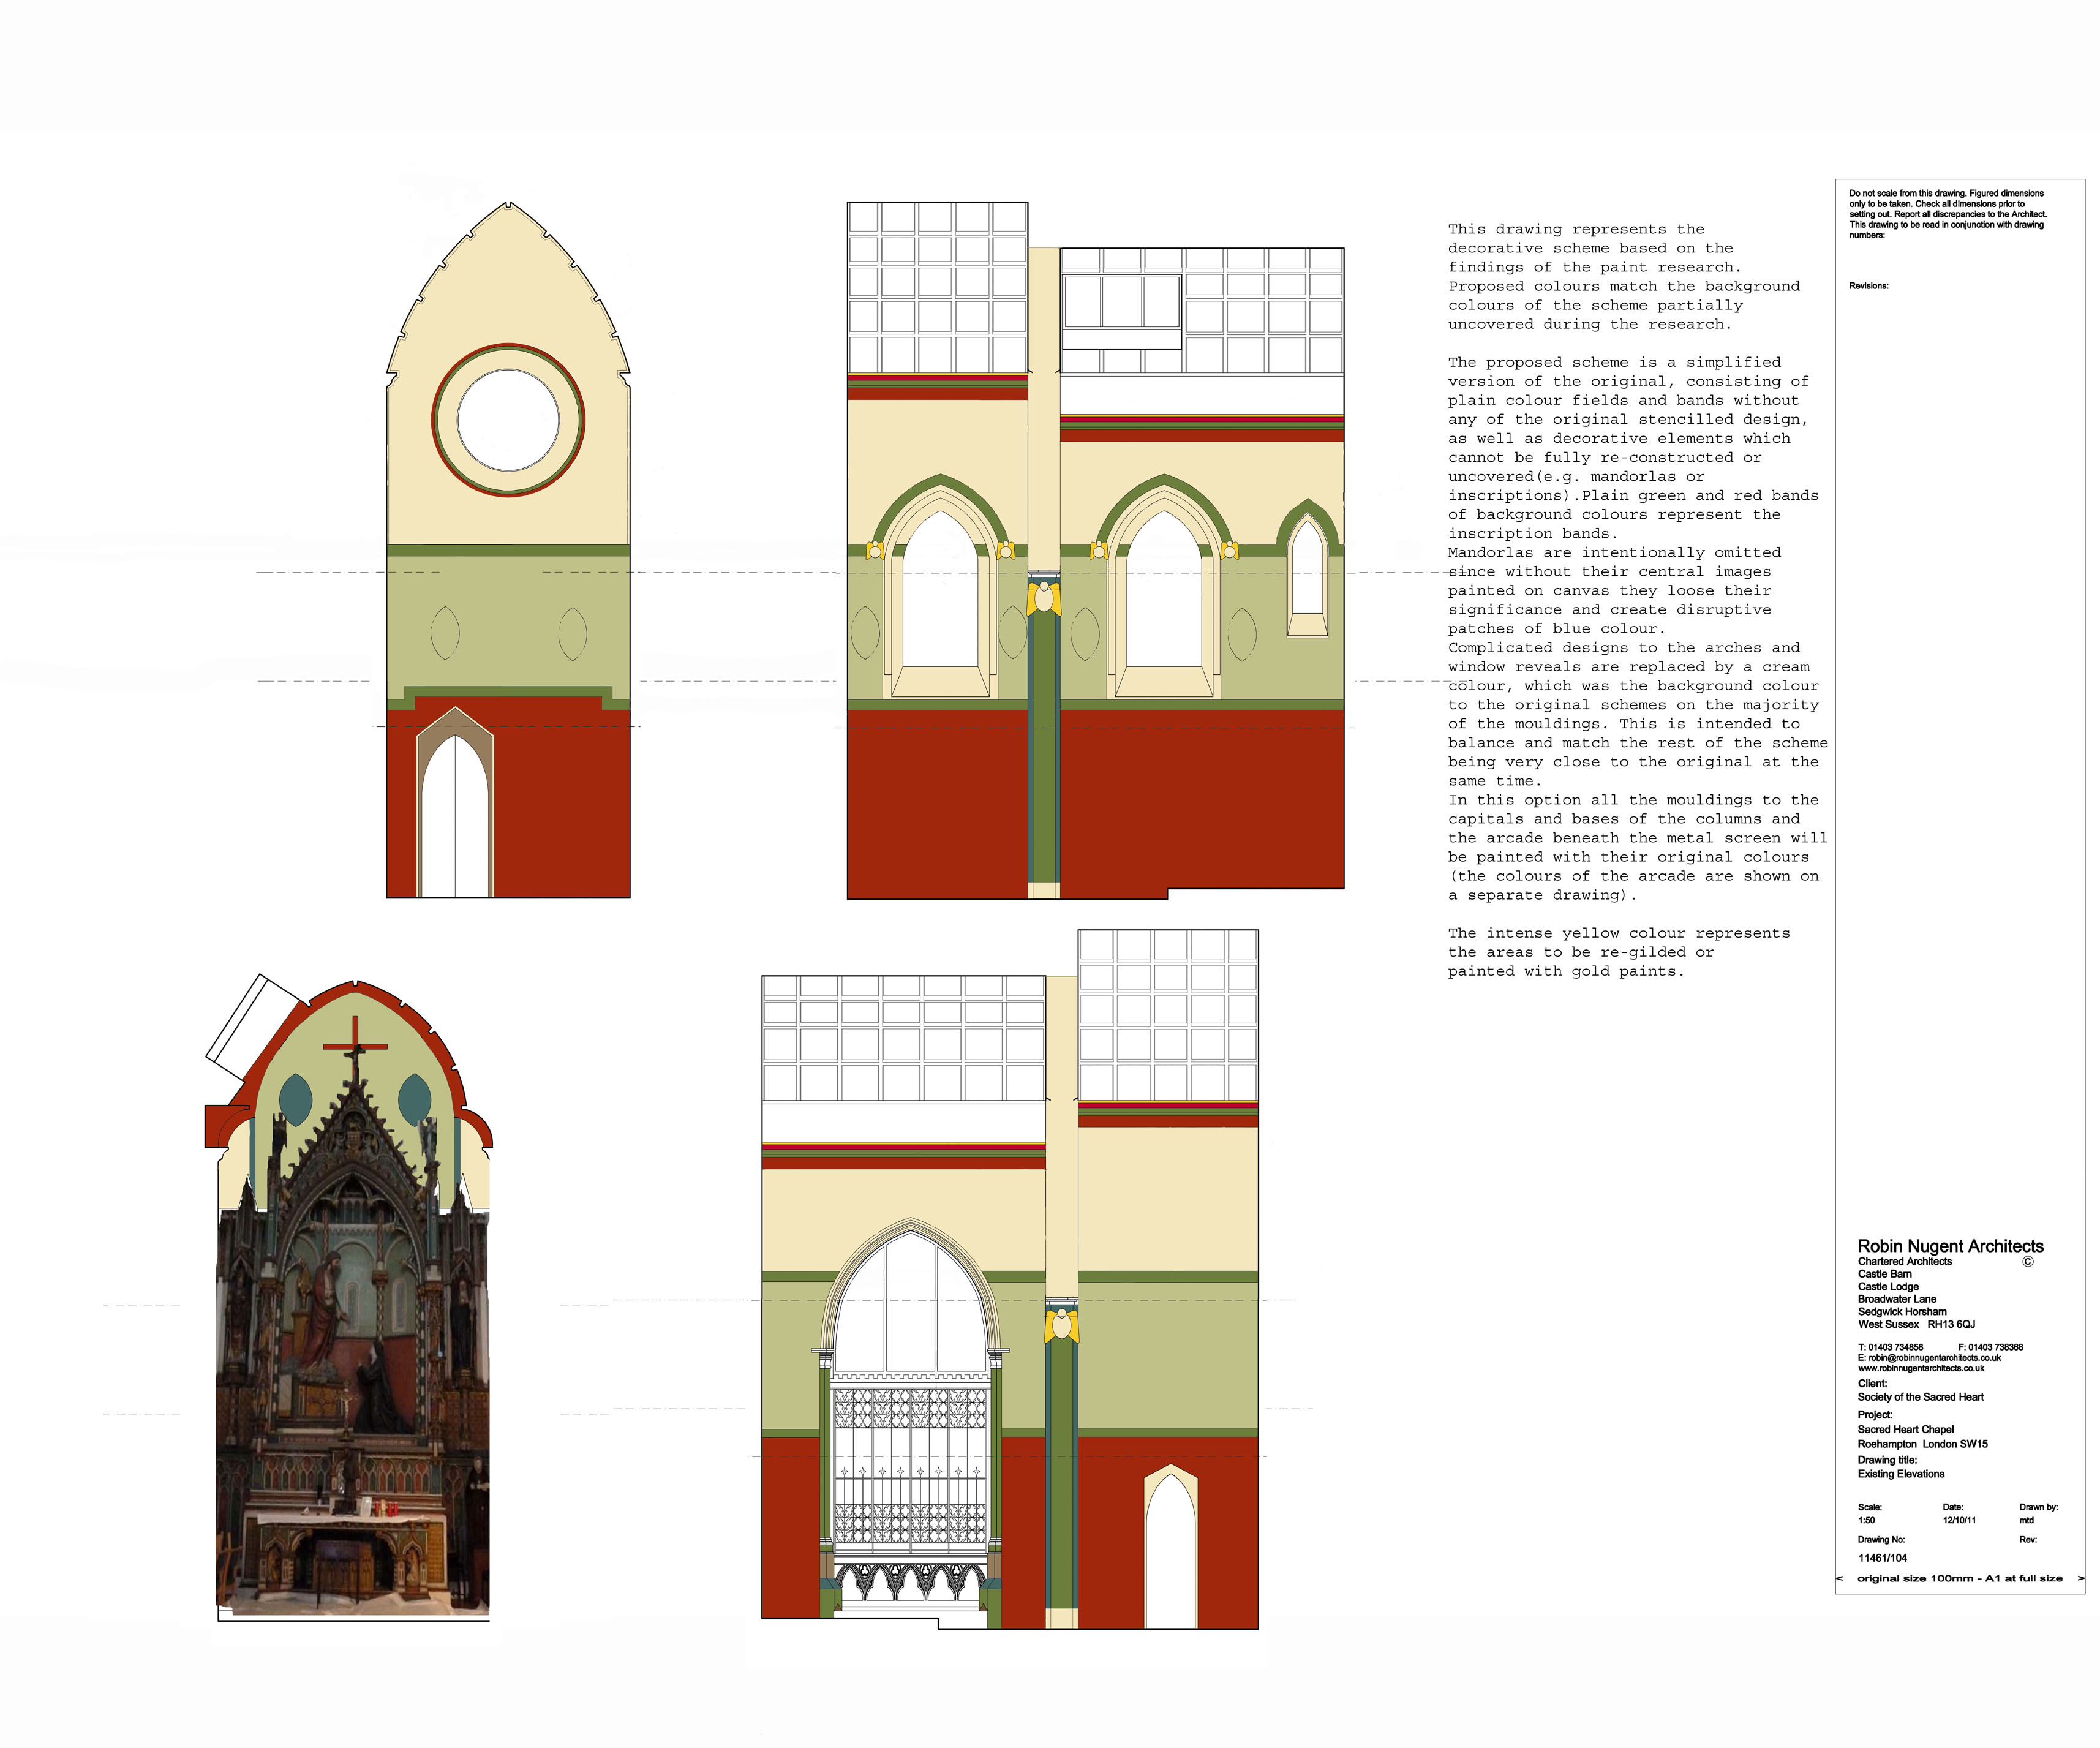
| Graphic programs and visualisation may be useful when presenting spot uncovering results and potential representation options to the architect and client, Chapel of the Sacred Heart, Roehampton | |
 |
Substrate stabilisation is required if unstable hollow areas exist between the layers of plaster and/or substrate, but filling blisters where there is no risk of fabric loss should be avoided. An injectable grout should be selected which is compatible with the original mortar (matched to its current condition rather than the original recipe), but it also has to have particular working properties which allow its smooth application by injection and which allow it to cure in the specific environment, frequently in the absence of air. In terms of performance, the grout must also provide a stable bond with the substrate within a reasonable time and with minimal shrinkage.
Mineral grouts based on hydrated lime (usually lime putty or dispersed lime) or hydraulic lime are considered the most suitable materials, mainly for their compatibility with lime mortars, but also for their adjustability
and performance characteristics. A quicker set can be achieved by using dispersed lime, mature lime putty, or nanolime. The latter, being dispersed in alcohol, also reduces the moisture transferred to the wall. Methods of partial substitution of water with alcohol are also being extensively tested. Other procedures which include resin consolidants may be justified, but resins are unlikely to be chemically or physically compatible with the wall painting. The materials used for substrate repairs should always be compatible with the original and should never be stronger than the surrounding fabric.
Repairs to the plaster substrate may be required to target any ongoing or potential instability. These usually consist of filling cracks and re-plastering localised areas using appropriate lime mortars, often after removal of old inappropriate and unsightly cementitious or gypsum repairs. Stable hairline fractures are normally left undisturbed because they can help to buffer tensions within the substrate, and filling can result in widespread failure.
Successful consolidation of powdering or flaking paint layers usually requires repeated treatment at various stages of the remedial process. Although ideally it should not precede surface cleaning, it is commonly needed much earlier to minimise damage to paint layers during stabilisation of plaster or other works, such as those involving structural interventions. A variety of materials and methods may be used as consolidants, depending on the character and condition of paint layers and their substrate, environmental conditions within the building, and also the size of the area to be consolidated.
Surface cleaning typically addresses loosely bound dust and more embedded grime, carbon-based residues, nicotine and other pollutants associated with people and animals. Other accretions which require removal from wall paintings include microorganisms, plants, insects and related residue, salt efflorescence and crusts.
Later coatings such as varnishes, overpaints and plaster or cement may be removed from the surface where justified. However, the purpose of such interventions must be clear, and the integrity of the original painting should be prioritised over aesthetic considerations.
Cleaning may involve dry and wet methods, including water-based solutions and organic solvents of varying polarity. The use of gels and poultices may be needed to achieve a satisfactory result, particularly for varnish and overpaint removal, or if preservation of the surface patina is of concern. Overpaint may be removed partially or fully for reasons of historic and scientific interest, recording or education, but it always needs to be supported by research indicating that it will not be at the expense of damage to overlying decorations, which may be of significance. Thorough research and testing should always precede the works and assumptions should never be based on the results of a similar project.
Retouching may or may not be included in the remedial works and it is mainly considered in the aesthetic categories. It is frequently undertaken to improve the legibility of the design and its clarity for the public or owner’s appreciation. Generally, retouching which is discernible at close range and aesthetically satisfying from a distance appears to be a successful compromise. Suitable techniques include: graphic methods utilising points (pointilisme) or vertical brush strokes (tratteggio or rigatini); methods employing neutral colour field or aqua sporca (‘dirty water’, obtained with diluted watercolours); retouching on fills lower than the surrounding surface (sotto livello); on a foreign substrate material not fixed permanently to the painting; or by the addition of phosphors easily discernible in UV light. Purely mimetic methods of retouching (facsimile retouching) are the least suitable from an ethical point of view, but may be justified for aesthetic reasons. In any case, retouching should be limited to the areas of repair and complete loss of paint layers.
The selection of remedial treatments presented above is generally applicable to paintings executed in various techniques on a plaster substrate.
THE IMPORTANCE OF LIAISON
The conservator is rarely the only person involved in treatment of a wall painting. Most conservation projects involve a team of specialists and consultants, and effective liaison and open dialogue between all parties are the best warrants of success all round, including meeting deadlines and financial targets. In this process the role of conservation architects cannot be overestimated because, due to contractual restraints, they are frequently the link between the conservator and the owner/client, and their interpretation of the conservator’s intention based on thorough knowledge and experience is in the best interest of the treated object.
FURTHER READING
- P D’Armada and E Hirst, ‘Nano-Lime for Consolidation of Plaster and Stone’, Journal of Architectural Conservation, Vol 18, No 1, 2012
- B Biçer-Şimşir et al, ‘Lime-based Injection Grouts for the Conservation of Architectural Surfaces’, Reviews in Conservation, Vol 10, 2009
- Cather S (ed), The Conservation of Wall Paintings, Symposium Proceedings, Courtauld Institute of Art and Getty Conservation Institute, London, 1991
- R Gowing and A Heritage (eds), Conserving the Painted Past: Developing Approaches to Wall Painting Conservation, EH Conference Post-prints, London, 2003
- R Gowing and R Pender (ed), All Manner of Murals: The History, Techniques and Conservation of Secular Wall Paintings, English Heritage, London, 2007
- Historic England, Nanolime: A Practical Guide to its Use for Consolidating Weathered Limestone, HE Technical Advice Note, 2017
- U Lindborg (ed), Conservation of Mural Paintings, National Heritage Board, Stockholm, 2001
- P Mora et al, Conservation of Wall Paintings, Butterworths, 1984